
Written by Amy Elizabeth
After writing this article, I realized I forgot the most important piece. It’s so important that it deserves its own preface!
YOU DO NOT NEED A DARK ROOM TO DO THIS.
You don’t even need a lot of space. You just need a sink and a changing bag. Once you get your film in the tank in your changing bag, it is light tight and can be worked with in daylight.
The investment to do this is relatively minimal, will pay for itself before you know it, and the developing process is so much easier than you might think.
So please read this article with the idea that you, too, can develop color film at home!


Why I Decided To Develop Color Film At Home
In January of 2017, I took the plunge into developing my own black and white film at home (you can read about developing your own black and white film here). But the idea of conquering C-41 color film weighed heavily on my mind.
I was afraid of developing C-41. People said it was difficult to develop color film at home, and it was something I had never done. Since I have a local lab that will do it in a few hours for a few dollars, what was the point of trying anyway?
But my local lab won’t push film, and most labs won’t develop film soup so as not to ruin the chemicals or other customers’ film (read more about film soup here).
Not only was the idea of having more creative freedom within the film world alluring, but, maybe more importantly, like many other film photographers, I consistently operate under the fear that something I love will disappear.
Whether it’s fear your favorite film will be discontinued or your local lab will stop processing, we all have a fear of someone else taking away our opportunity to shoot this medium that we love. THIS. This is what drove me to learn how to do it myself.
Without delay, here’s how I develop C-41 at home:
How To Develop C-41 Color Film at Home

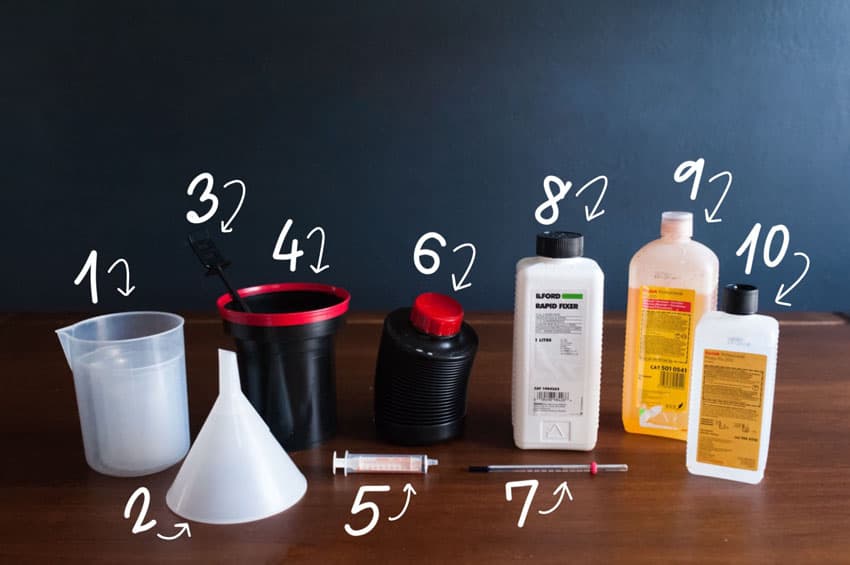
Supplies:
Links are included to the products I use:
- Paterson Tank and Reels – Same one I use to develop black and white film. – (Amazon: Paterson Photographic Universal Tank)
- Funnels – I use a separate funnel for the chemicals so I don’t cross-contaminate. – (Amazon: Plastic Funnels)
- Plastic beaker for measuring water when the chemicals are mixed – This is the same one I use for developing black and white. – (Amazon: SEOH Plastic Beaker Set)
- Thermometer – I bought a two-pack, but, lately, I have only been checking the temp of the developer since the blix has more latitude. I also labeled which thermometer is for which chemical so I don’t cross-contaminate. – (Amazon: Home Brew Stuff 12″ Dial Thermometer)
- Basin for heating up bottles – (Amazon: Sterilite 12qt Dishpan)
- 3 opaque bottles – The size will depend on what kit you buy. I have the kit that makes 1L chemicals, so I bought the 1000ml bottle. – (Amazon: 1000ml Darkroom Chemical Storage Bottles)
- C-41 kit – The kit will contain developer, blix (a combination of bleach and fixer), and stabilizer. There are lots of kits out there, but I have used the one from Film Photography Project. They also sell a 2L kit! – (Film Photography Project: FPP C-41 Development Kit)
- Timer – I use the Massive Dev Chart app for this, which is also what I use for black and white film. This app doesn’t have a C-41 setting, but I found a way to hack one. The instructions linked don’t have the correct times for manual developing, but gives you an idea how to edit the settings.
- Scissors for cutting the 35mm off the end of the spool and for evening out the tab – I stated this in my last tutorial, but I use safety scissors because me with sharp objects in an opaque bag is a recipe for blood. (Amazon: Blunt Tip Scissors)
- Church Key for opening up a 35mm film canister – (Amazon: Bottle and Can Punch Opener)
- Changing bag for getting the film onto the reels – (Amazon: Film Changing Bags, Adorama: Large Changing Bag)
Your kit will also recommend gloves, mask, and goggles. Do I use them? (Find gloves, masks, and safety glasses on Amazon)


C-41 Color Film Developing Process:
The good news is that you will receive instructions with your chemical kit! The other good news is that C-41 (with blix) is all the same developing time and the same process, so what I outline here should match what your instructions say.
Mixing Chemicals
Some people say C-41 is easier than black and white, and I kind of get that because you mix your chemicals once and keep reusing them until they’ve run their course.
Basically when you stop liking your results is how you know they’ve run their course. It will be a gradual decline so it’s up to you to decide when your results are less than ideal, at which point you’ll mix fresh chemicals.
Before mixing my chemicals, I mark all my bottles and caps with a D, B, or S (developer, blix, stabilizer) so that the caps will never cross-contaminate the bottles.
I also mix my chemicals completely backwards; I start with the stabilizer, then do the blix, and finally developer.
The developer is the most critical, temperature-wise, so I do that last so when all the chemicals are mixed I can start developing my rolls without fear that the temperature has dropped too much.
Stabilizer: This is the easy one since it can be at room temperature. For this one I pour all 1000ml of water into a bottle, then funnel in the stabilizer, cap it, shake it up, and set it aside.
Blix: It’s most common to find chemical kits (for manual use) where the bleach and fixer are joined in a single step (hence the name “blix”). Some purists refuse to combine these steps, but it’s relatively difficult to find kits that will ship in the mail with the bleach and fixer separate.
For this step, I get my water up to 110º and pour 800ml of it into the bottle. I then funnel in the packets marked Blix A and Blix B, cap it, shake it up, uncap it, and add the remaining 200ml water. Then, I cap it, shake it up, and set it aside.
Many people remark how this is the “nasty stuff.” And it is. But if you ever highlighted your friends’ hair with Frost and Glow back in the 90s, then this smell will be reminiscent of trying to achieve that perfectly chunky look a la Britney that we all strived for.
Developer: I get my water up to 110º and pour 800ml water in one of my bottles. I then funnel the developer into the bottle, cap it, shake it up, and open it to funnel the remaining 200ml of water into the bottle. Then, I cap it, shake it, and set it aside.

Developing
Now that your chemicals are mixed, you can go right into developing your film rolls!
If you’re working with chemicals that were previously mixed and cooled back down to room temp, you will need to heat up the developer and blix to 102º.
I do this by placing the capped bottles into a basin and running hot water into the basin. You can also use a sous vide (find on Amazon) to heat the water to temperature, but so far the basin method has worked fine for me.
Once I start warming up the bottles, I load the film onto reels, and, by the time I get back, my chemicals are just about at 102º.
I keep separate thermometers and funnels for my developer and blix because you never want fixer to get in the developer; it will kill it like it’s its job…which it is.
Once your chemicals are up to 102º, you’re ready to start!
- Pre-Soak: (1 min) Fill your developing tank up with 102º water and let sit for one minute, pour out.
- Developer: (3.5 minutes) Pour in developer and agitate with the agitation stick for 10 seconds. Place cap on the developing tank and invert tank four times every 30 seconds. Funnel the developer back into its bottle.
- Blix: (6.5 minutes) Pour in blix and use same agitation scheme as above. (Note: there is NO rinse cycle between developer and blix!) Funnel the blix back into its bottle.
- Wash: (3 min) Rinse film, while still in the developing tank, under running water (between 95-105º)
- Stabilizer: (30 seconds) Pour in stabilizer, agitate for 15 seconds, and let sit for 15 seconds. Funnel back into its bottle.
You’re now ready to take the film off the reel, squeegee (I use the two-finger method…some people don’t squeegee at all), and then hang your film to dry for a few hours or overnight.
I hang mine on a line in the basement with a binder clip (find on Amazon) at the top and one at the bottom to weigh the film down so it dries straight.
And you’re done! People, this is literally IT. And since all C-41 film gets processed for the same amount of time, you can use these directions for every film stock (unless you’re pushing your film.)
It also goes incredibly fast. I was so used to the slow pace of black and white processing that the first time I did C-41, I actually felt panicked. (Note: This is ridiculous. There’s actually nothing to feel panicked about.)

Helpful Videos For Developing Color Film At Home
If you are more of a visual learner, here are a few videos that helped me get started developing C-41 at home:
- Develop Color Negatives At Home from Film Photography Project on YouTube
- Home Developing Color Film from Lomography on YouTube

How To Push Film During Developing
Pushing film is a process of adjusting developing times to compensate for underexposure. It also tends to add more contrast and color saturation to your images.
To push your film, simply increase the developing time by 25% for each stop pushed. (Everything else stays the same).
So if you want to push your film one stop, you’d multiply 3.5 minutes by 1.25 and develop for 4.4 minutes.
(The math major in me needs to point out that 4.4 minutes IS NOT the same as 4 minutes 40 seconds. It’s 4 minutes and .4 minutes. To convert the .4 minutes to seconds, multiply by 60 to get 24 seconds. So you would develop your film for 4 minutes 24 seconds.)
Likewise, if you want to push two stops, you multiply 3.5 minutes by 1.5 to get 5.25 minutes (or 5 minutes 15 seconds).


How To Cross-process Film
One of the ways I wanted to experiment with film was by cross-processing.
Basically cross-processing is a technique that involves taking color negative film, which is usually processed in C-41 chemicals, or taking slide film, which is usually processed in E6 chemicals, and using the opposite chemicals to process them.
So, if you wanted to cross-process, you’d process your color negatives in E6 or your slide film in C-41.
The most common type of cross-processing involves taking slide film and developing it in C-41. This will give the developed film high contrast and fun color shifts.
Whether or not cross-processing ruins your chemicals is up for hot debate on the internet, but from what I could tell, more people said it doesn’t ruin your chemicals. So I went with the majority and assumed it would be a totally great idea to use my fresh, new C-41 chemicals to cross process some Fujichrome Provia 100F.
When I pulled my Provia off the spool I was giddy because I could see images! I more than half expected it to be blank or messed up somehow.
After waiting what seemed like forever for it to dry (Related: is anyone looking to get rid of a film dryer?) I finally scanned my negatives and was elated with the results. High contrast! Color shifts! My creativity was flowing!
That month, I developed a couple other rolls at home, and the color seemed off. My chemicals weren’t ruined, per se, but things weren’t how they usually were if I had gotten them developed at my local lab.
I wasn’t sure if this was just how the kit developed negatives, or if I had actually ruined my chemicals by first using them to cross-process.
Because hope springs eternal, I decided to order another kit for a fresh start.
I mixed up the new kit, and I was nervous to develop my first couple of rolls. What if the results were still funky? What if it was all user-error and I’d never be able to develop a normal roll of film? (I’m dramatic like that.)
But guess what? The results were exactly what I would have hoped for!


How To Develop Film Soup
Before I dumped out all the cross-processing chemicals, I knew I needed to get one final hurrah out of them by using them to develop some film soup.
Film soup is a process of soaking a roll of film in materials, such as dish soap or lemon juice, before developing to create color shifts and artifacts on your film.
If you want more details about film soup, check out this film soup tutorial or these 7 different film soup recipes!
I soaked my film in water that had been brought to a boil, along with some freshly-squeezed lemon juice (only the finest for my film), and Rockin’ Green laundry detergent (find on Amazon). I bought the lavender mint scent, because I do kinda wonder if different scents would have different effects.
My plan was to let it dry for a couple weeks but HOW DOES ONE WAIT A COUPLE OF WEEKS? So approximately 4 days later, I developed my film.
It was still a little wet and sticky, but I got it on the reel without too much hassle, which was my only real concern with not letting it dry for a couple of weeks.
Once again, experimentation wins, and I am definitely a fan of how the soup turned out. I think the lemon juice may have stripped it of more color than I would’ve liked, but I’m trying to embrace the unexpected.
Next time, I plan on using some detergent and baking soda…the options are limitless with film soup!

While I’ll still bring film to my local lab, now I have freedom to push my film, cross-process, do film soup, or anything else my experimentation leads me to.
And if my local lab stops developing film (fingers crossed that this NEVER happens), I will know that as long as chemicals are being made, I can go on shooting film. :::insert huge sigh of relief:::
If even a small part of you has toyed with the idea of developing your own film at home, listen to me, JUST DO IT. It is not difficult, relatively inexpensive, and will allow you to experiment with film on a whole other level.
And as always, let me know if you have any questions!
Another amazing article, Amy! Thank you so much for sharing with us! You can check out Amy’s other Shoot It With Film articles here, including a b&w home developing tutorial and a Kodak Ultramax film review!
To see more of Amy’s work, be sure to visit her on her website and Instagram!
Leave your questions about developing color film at home below in the comments!


Leave a Comment
Shoot It With Film on Instagram


Blog Comments
Peter Stout
June 22, 2018 at 11:28 am
Amy you are badass. You got me dev’ing B&W at home, now I’m excited to try C41. It’s the scanning that I’m not looking forward to!
Tom
September 1, 2018 at 4:44 am
Love this!!
I develop at home all the time, but have never pushed it or gotten creative with it. I will now. Thanks!!
Sai
May 18, 2020 at 8:06 am
Amy, thank you so much for walking through the process. I developed my first 35mm color roll yesterday and was thrilled to see the results. I haven’t scanned the negatives yet, but they seem to have come out well. I started with color, so need to try B&W next, as well as 120 film. Thanks again and keep up the good work!
Amy
May 18, 2020 at 3:57 pm
That’s wonderful! Congrats on your first roll! Once you get one process down, learning the other is easy since they’re very similar. BW is just a little slower-paced so I usually throw a show on my iPad and watch while I develop; it’s good alone time!
Melissa
March 16, 2021 at 5:06 pm
Does film souping work with b&w??
shootitwithfilm
March 16, 2021 at 5:09 pm
Yes! You can soup b&w film. This article has a lot of different examples of what film soup can look like with b&w film: https://shootitwithfilm.com/black-and-white-film-soup-experiment-an-art-or-a-science/
Mark
March 27, 2021 at 3:27 pm
Good article on film soup. First time I have heard of this. Good stuff
Courtney Bell
June 2, 2021 at 10:56 am
Alright, lady. I’m doing this! For some reason, I’ve always been under the impression that developing color film at home was a much more complicated process than developing b&w film. So, reading your article absolutely blew my mind! In fact, as soon as I finished reading it, I filled my Amazon cart with almost every single link you posted above AND I threw in an Epson Perfection V600 scanner! While it was quite an investment to get started, I realized that I’ll be saving SO much money in the long run if I just develop and scan my own negatives. So, thank you so much for explaining this process in a way that makes me feel confident that I’ll be able to do it, too. (Fingers crossed!)
Courtney Bell
Amy Berge
June 2, 2021 at 9:06 pm
Hi Courtney! THIS IS MUSIC TO MY EARS!!!!! People make it out to be so complicated, but it’s NOT. I thought I’d have to be extremely precise or else it would be Wonky City! I am so excited this empowered you to have your hand at it. Cannot wait to see what you create!!!!! It WILL pay off in the not-so-long run!
Jeff
September 13, 2021 at 7:12 am
I’ve been developing C-41 color film at home but my chemicals need to be replaced with new ones and I’m not sure how to properly dispose of my old chemicals. I live in Minneapolis. Can I just pour them down the drain or do they need to be taken to a hazardous waste facility?
Amy Berge
September 13, 2021 at 2:08 pm
I’m in Minneapolis too! I was going to dispose of my chemicals on waste day, but I was out of town. So my chemicals are sitting in my basement in gallon containers until I take them to the waste site.
Akhil Tyagi
September 15, 2021 at 12:35 am
This helped me a lot ,I revived my father’s camera and also his dark room used for development of rolls, I wish that future generations should also read this and look the glory and hardwork done by our Fathers just to take 1 photo
Shane
May 18, 2023 at 10:05 am
Thank you so much for this article! I am getting back into film again after years shooting digital. This has me excited and unafraid to take the plunge at home.
As I recently picked up an Olympus Pen FT half frame 35mm, do you have any recommendations for developing two halves of one frame?
Much appreciated!
shootitwithfilm
May 18, 2023 at 3:12 pm
Hi Shane! The developing process will be the same with a half-frame camera. You don’t have to do anything different! When it comes to scanning, you can either scan the images as single images or scan them in sets of two or three (or even more). Here are some tips and examples for scanning half-frame images: https://shootitwithfilm.com/scanning-film-borders-with-the-epson-v600/
Walter Otto
June 17, 2025 at 1:27 pm
Excellent submission. However, I must add that you overlooked an important piece of hardware: a good water filter, both for preparing the chemicals and for washing the film. Regarding the hooks for hanging the film, although they aren’t so important, the film can be hung to dry using any suitable support.
Another point I noticed in your submission is that the push processing after the second stop is not as mathematically precise as the first stop, since the reciprocity factor must be taken into account when the film is pushed more than one stop
I really enjoyed your reading, especially the part about the things we love to do.
Apologies for writing so late; you might not be working on this anymore.
Best regards, and let’s keep taking photos.
By the way, this weekend I shot my first roll in 25 years.