
Written by John Adams III
Using flash units with old analog cameras can seem like a super daunting task.
How are you supposed to make a brand new flash work with a camera originally made in 1969 or earlier?
Thankfully, there are a few tricks to make your journey into flash photography with film super simple.


Let me begin by saying I am not an expert in using flash, nor do I believe my method of using flash with film to be the best way or even the correct way. I simply want to share with you guys the method I’ve found to be the most convenient!
I recently picked up a Neewer S300N flash unit with a pair of Neewer Wireless Flash Triggers with the intention of learning how to incorporate flash into my workflow.
Using flash was something I was scared to use for a long time.
The biggest question I had before starting was, How do I meter for my scene when using flash? And how do I avoid overexposing everything? The answer? Your digital camera!
Find the Neewer S300N flash on Amazon.

Using Your Digital Camera as a Light Meter
This may seem like a strange concept, but it’s actually used by a lot of people. Using a digital camera as a light meter with your flash is a great option for a few reasons:
- Quality of the digital camera doesn’t matter. You’re just using this to check the light. Many can be had for a couple hundred bucks on eBay. My very first camera, the Canon Rebel T2i (find on eBay), can be had for less than $200!
- Immediate feedback on your lighting. Is the power of your flash too bright? Does shooting at f4 look better than at f8? These are things you can check and correct immediately before burning through your precious film.


My Workflow when Working with Flash and Film
Connecting Your Flash Triggers
I begin by plugging in and turning on my Neewer S300N flash unit.
One trigger will plug into the flash, set to the “Flash” mode. The other trigger will slide onto the hot shoe on top of my digital camera, also set to the “Flash” mode.
I’ll then press the shutter simply to ensure the connection is there and that the flash fires.


Positioning Your Flash
There’s a million and one ways to position your flash for proper lighting (and I don’t know any of them), so many times I find myself positioning the flash to face the wall opposite my subject.
Assuming you have white or off-white walls, this bounces the light all throughout the room giving a soft, white lighting effect with minimal shadows.
Again, this is just one way to position your flash that I’m describing for the purposes of this article – be sure to light your subject according to your creative needs!

Understanding Sync Speed
With the flash set, I’ll now start taking test shots on my digital camera and adjusting my settings according to how bright or dark the image is.
This is when you will need to know the flash sync speed of your film camera.
What is sync speed and why do you need to know it? In short, when you fire your shutter while utilizing flash, you have to ensure your shutter isn’t closing faster than the speed of the flash. Otherwise, you will have a completely blank image or a half exposed image where the shutter curtain wasn’t completely out of the way when the flash fired.
For many cameras, the highest your shutter speed can go while using flash is 1/125. For the Canon AE-1 it is 1/60, and for some cameras with leaf shutters, such as the Mamiya RB/RZ and Hasselblad 500CM, you can shoot at any shutter speed you like.
Before you begin shooting with your film camera, double check the flash sync speed and don’t exceed it.

Taking Test Shots
So, let’s say I’m taking some soft portraits with my flash.
I’m going to set the aperture on my digital camera to f4, as that is the widest I can go on my film camera.
My ISO will be set to 400, because I’ve got Kodak Portra 400 loaded in my camera.
The last piece is determining the proper shutter speed. The fastest speed the Mamiya RZ67 has is 1/400, so I’ll dial that in to my digital and start there by taking a test shot.
If it is too bright, I either need a faster shutter speed (which I can’t do because the RZ67 tops out at 1/400,) a narrower aperture (something I don’t want to touch because I want the soft look of f4,) or I can decrease the power of the flash.

The Neewer flash I own shows the power as a number between 26 and 90, so determining the best setting is mostly guesswork.
Once a proper exposure is found, I will make a note of my camera settings and be sure not to change the flash’s power.
In this example, if the original test image on the digital were too dark, I could brighten the image by slowing my shutter speed down from 1/400, effectively letting more light into the scene.

Connecting the Flash to Your Film Camera
Now that we’ve found the camera settings necessary to achieve a proper exposure, we can set up our film camera with the flash.
In this example, I shot photos of my wife with both the Mamiya RZ67 and the Yashica Mat 124.

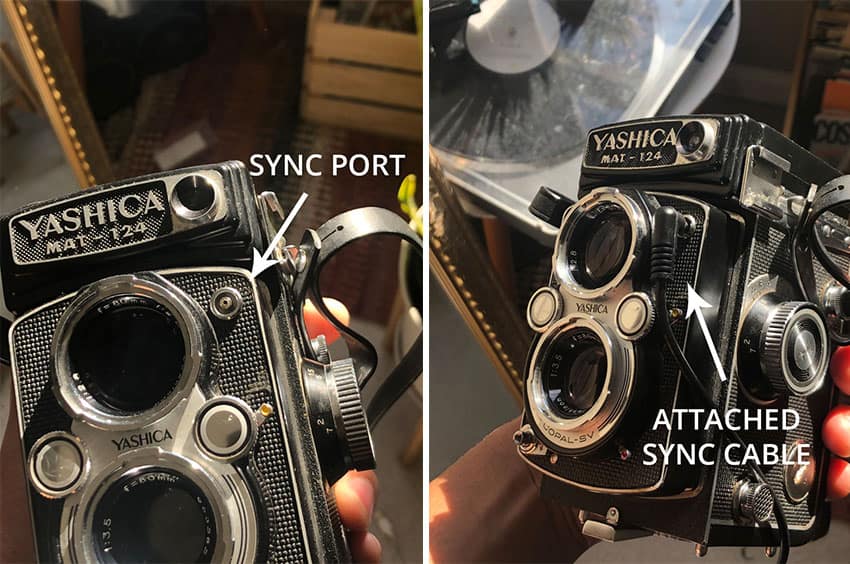
Connecting the Flash with a PC Sync Cable
When setting up the flash with the Yashica, I grabbed a standard PC Sync cable, which came included with the Neewer flash triggers I purchased, and plugged one end into the flash and the other into the input port on the front of the Yashica.
(You can test your flash to see if it’s working by plugging in the PC sync cable and firing the shutter prior to actually loading film.)
Once your cable is plugged in, that’s it! You’re officially shooting with flash, it’s that easy.
Dial in the settings that you found to be correct with your digital camera, and shoot away.
Connecting the Flash Wirelessly
When connecting the flash to the Mamiya RZ67 for these photos, I utilized the wireless triggers, although the PC Sync cable method would have worked perfectly. The only difference being that the cable input is on the lens and not on the camera body itself.
Much like a digital camera, I plug one receiver into the flash, ensure it’s on the “Flash” function, and slide the other one onto the hot shoe of the camera.
A quick test shot before you load film will show you that the flash fires properly.

That’s it guys! Taking the fear away from working with flash and film can be very easy with a little help from the digital tools at your disposal.
Remember, there are no rules to art! Use the tools at your disposal to give you the best result possible!
Thank you so much, John! John is a regular contributor here at Shoot It With Film, and you can check out his other articles here, such as a review for the Mamiya RZ67 and a tutorial for 3D film photography. You can also check out more of John’s work on his website and Instagram.
If you have questions about shooting flash with film, leave them below in the comments, and you can pick up a Neewer S300N flash unit and Neewer Wireless Flash Triggers on Amazon!
Check out all of our film photography tutorials here.


Leave a Comment
Shoot It With Film on Instagram


Blog Comments
Iggy
April 23, 2021 at 9:46 am
Thank you for this article! I thought I would need to get some complicated / or extra triggers specifically for film cameras but my Godox set up with a Sekonic sync cable that I have worked flawlessly on first shutter release!!!
This makes my Friday morning very happy! Now I can implement flash photography into my film!
Thank you, John!
Dewayne Carver
May 20, 2021 at 8:21 pm
Great article! Using a digital camera to check your exposure, with or without a flash, before shooting film is consistent with traditional film shooting, i think. In the late 1980s, i had a chance as a college student to model for a fine art photographer doing an NEA grant project. I recall he was using a Hasselblad, but he made test shots first using Polaroid film to check his settings. To me, that’s not so different from using a digital camera to check your work. I love the way today’s photographers are mixing old and new tech. If you read history, that’s what photographers have always done! Keep up the great work.
James
January 18, 2023 at 7:01 am
One thing to remember. When using flash, the shutter speed only controls the amount of ambient light being captured. The aperture or power of the flash controls the exposure of the artificial light falling onto / hitting your subject.
Ray Goulter
March 29, 2024 at 7:40 pm
There is one matter regarding shutter speed that does influence flash photography. Most cameras with focal plane shutters (majority of 35mm film cameras) have shutter speeds shorter than synchronisation speed – normally 1/125sec. 35mm cameras usually indicate the shortest shutter speed with a red coloured shutter speed indicator. If a shutter speed shorter than that is selected, the second shutter blind following the first shutter blind will already cover part of the film because exposure is dictated by the ‘slit’ between the shutter blinds. Using a shutter speed shorter than flash sync results in a dark band on the film, either vertically or horizontally, depending upon the type of shutter blind used by the camera. This is not a problem with leaf shutters, where any shutter speed is ok. Other than the forgoing, shutter speed has no effect on the flash exposure other than capturing ambient light, as mentioned by James. Hint: Use flash when photographing people outdoors to increase exposure in areas of the face, called ‘fill-flash’. Flash output is selected by co-ordinating the flash output with the ambient light shutter speed. This is particularly handy when photographing wedding groups outdoors on sunny days.