Written by Jennifer Stamps
There are a few reasons to scan your own film – even if you don’t develop it.
(Although, you should try developing film at home. It’s fun and easier than you think! SIWF has a tutorial for developing black and white film and one for developing color film.)
But I digress…the three reasons to scan your own film are that it’s faster, you have creative control, and you save money.
I know it can be daunting to get started.
Before I started scanning at home, my biggest concern was I thought I’d be stuck behind a computer for hours (which is one of the main reasons I got rid of my digital gear). Let me say, that’s not the case. Especially if you develop as you shoot and only scan a few rolls at a time.
So, here’s how to get started scanning your film negatives at home…

Choosing a Scanner for Film Negatives
There are so many options out there, and it can be overwhelming. I polled my Instagram feed, and, overwhelmingly, they recommended the Epson V600 (find on Amazon). It’s a flatbed scanner, and the one I ended up buying.
There are two things that drew me to the Epson V600 scanner (other than the overwhelming positive reviews): the price and the fact that you can scan 35mm and 120.
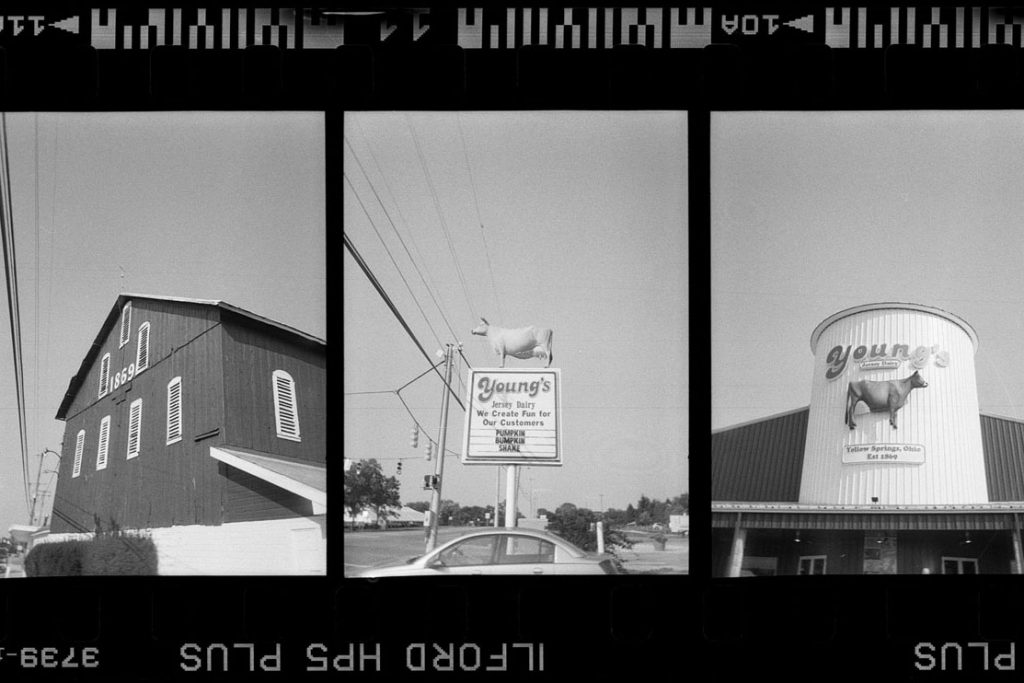
And actually, I recently started scanning 110 film negatives from my childhood. You can also hook it up to scan 35mm sprockets. You can read more about shooting sprocket holes with your Holga here.

Related: Scanning Film Negatives with a DSLR
Using the Epson Scan Software
I use the Epson Scan software that comes with the scanner. As far as computers go, you don’t need anything special. If it can run PhotoShop or Lightroom, it should be able to run Epson Scan.
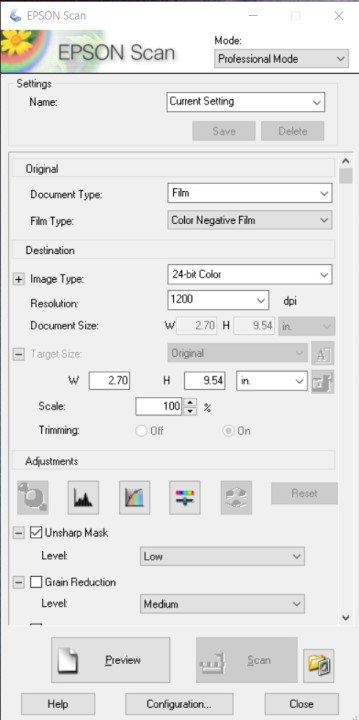
When you start to scan, you have a few options to make: document type, film type, image type, and resolution. I keep my resolution at 1200 dpi unless I want to print something massive.
The document type and film type are pretty straight forward. Image type is either 24-bit color or 16-bit grayscale. Easy peasy.
Don’t mess with the target size, that’ll change once you preview and crop your scans (and that’s why it seems like the resolution is insanely large…because the scan size is the actual size of the negative).

What to Expect
Scanning black and white is one million times easier than color in my opinion.
Your first roll with the V600 will take a little time, but once you get the hang of it, you’ll be cranking out a roll every 30 minutes or so…faster for 120.
The more consistent you are with nailing exposure throughout a roll while shooting, the faster and easier scanning will be.
When I scan black and white, I rarely adjust any of the settings. If I do, I adjust exposure and/or contrast, that’s it.


Color is a different story. With regular color film, that’s when it gets a little trickier.
You want your greens the perfect green, your skin tones nice and creamy, yellows mellow…well, you get it. It’s the reason many film photographers create profiles with labs.
I don’t edit my scans in Lightroom, so I try to get it right while I’m scanning. The common settings I adjust with standard color film are brightness, contrast, saturation, and color balance.
Here are some more tips for color correcting your film scans.
You adjust these on each image. When scanning, I truly believe that less is more…much like editing.
If I’m shooting with a fun film like Psychedelic Blues, Lomochrome Purple, or any of the Revolog films, it’s easy and I usually don’t touch the settings.

Troubleshooting Common Film Scanning Problems
1. Dust on Your Film Scans:
Dust. Dust. Dust. Get a microfiber cloth (and cotton gloves if you’re REALLY worried). I handle my negatives with my bare hands, but I like to live on the edge.
Use the microfiber cloth on the glass of the scanner and your negatives before scanning. Trust me. Nothing more annoying than hitting preview only to see dust or dog fur on your negatives.

2. Newton’s Rings on Your Negative Scans:
Newton’s rings are a visual artifact that can show up on your film scans that look like wavy lines or circles. They are caused by an optical interference with the scanner glass and show up as small areas of distortion on your scans.
Here is a detailed look at what Newton’s rings are and how to fix them.
3. Negatives Slipping Out of the Negative Holder:
Another common issue I have is scanning my 120 negatives. I didn’t realize it until I got back from Europe and had 14 rolls of film to develop and scan. Scanning 14 rolls in one or two sittings teaches you a lot.
The negative holders the Epson V600 are marginal for medium format – especially if your negatives are a little curly. They slip out of the holder a little too easily. So be gentle.
And if you hate the Epson negative holders, you can always buy them from a third party (I’ve heard Lomography makes good ones and there are a few on Amazon, but I’m still rocking the OG holders and just having patience).

Overall, it seems a little daunting, but once you get started, it’s addicting.
I have loved becoming more attached to my work. I shoot predominately black and white now and absolutely love feeling connected with my photos from start to finish.
Thank you so much, Jennifer! Jennifer is a regular contributor here at Shoot It With Film, and you can check out her other articles here, like a tutorial for developing color film in b&w chemicals and a camera review for the Olympus OM-1 35mm film camera. You can also check out more of Jennifer’s work on her website and Instagram.
Leave your questions about scanning below in the comments, and pick up the Epson V600 scanner for yourself on Amazon!


Blog Comments
Edwin
July 14, 2020 at 6:04 pm
Love the simplicity of your approach!
Cameron Foshee
June 2, 2021 at 1:53 pm
Really helpful article you’ve written. I only have one question and forgive me for not understanding, but does the Epson Scan software convert the negatives to positives? Because the only way I’ve seen it done otherwise is with Lightroom plugins.
Jen Stamps
June 3, 2021 at 8:41 am
That’s such a great question. The Epson software DOES convert the negatives to positives. Can can also scan them as positives and use third part software or convert in lightroom, but it’s not necessary.
Steven Pam
June 26, 2021 at 12:18 am
Good overview, Jennifer, thanks!
I gather you meant 110 film, not 110mm 😆
shootitwithfilm
June 26, 2021 at 12:50 pm
Thanks, Steven! We updated the article! 😊