
Written by Alec Pain (Alastair Place)
Despite the extra weight on your already heavy camera bag(s), long exposure film photography with a tripod can be a very satisfying way of spending an hour and a half, an entire evening, or a very early morning. It’s a unique way to create beautiful images – if you are prepared to brave the cold and the wet.
Experimenting with long exposures will really help you to build your skillset, spend more time on composition, and produce more satisfying pictures.

A Few Notes About Photographing Long Exposures in Low Light
Talking of composition, when working in low light and the darkness of night, a film camera like the Yashica Mat 124G is perfect for seeing what your final image will look like. It has a large, waist level viewfinder making it easier to see and compose your shot when there isn’t a lot of light.
In terms of metering, a light meter in low light isn’t really going to help, but after a while you begin to judge how long your exposure might be – and adding a couple of seconds usually doesn’t or won’t do your finished image any harm. After all, if it is pitch black, a couple more seconds aren’t going to make a great deal of difference. Here are a few starting exposures to help with low light.
Do remember that reciprocity failure can be a factor on some films, but I’ve not had any issues using the various films in the shots below.


Shooting Film at Night and What I Learned
I took two rolls of Lomography Turquoise film in Bath, London and Stuttgart and allowed for a different amount of light (or time) – dependent on the circumstances.
For instance, I took this shoot with a 3 second exposure at F11, because I wanted to capture the movement of the people walking down the steps. I started my exposure just as they arrived at the underground entrance.
The building behind it and the Underground sign were all very well lit up:

For the bike, I wanted to capture the lights of the buses going past (and I wanted to see what a blue bike looked like in Lomo Turquoise!), so I allowed the same amount of time for the bus to pass so that I could capture its trails.

Related: Five Tips for Shooting Film at Night
Learning From My Mistakes
Exposures that don’t work also give you an idea of what to avoid.
For instance, I took this earlier in the evening at Smithfield Market in London – the exposure was a little too long (around 5 seconds), and, whilst there’s a lovely blue light around the cupola of the market building, the shot has been blasted by too many car headlights.
A black card or something to cover the lens is always a useful thing to carry with you as you can always stop/restart the exposure until they have gone.

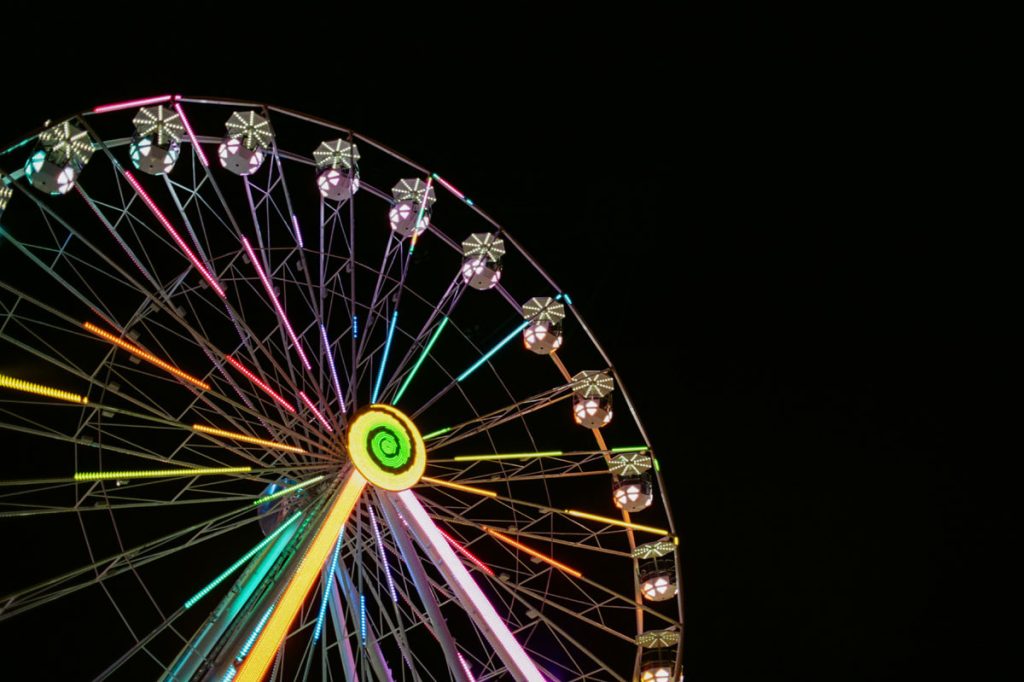
These two pictures of the Ferris wheel taken from different viewpoints also show you what was successful and what wasn’t.
The first image shows you how dark it was around the Ferris wheel – with minimal lights on in the building behind it or in the square in front of it.
It’s about an 18 second exposure at F22, and the light of the Ferris wheel is fine, but I think a little too bright if anything.
The second image (taken five minutes later from closer up) was a lot shorter of an exposure because I had less that I wanted to include in the shot.
When I got the film back I felt that I had exposed the second one more successfully and took the learning on board.


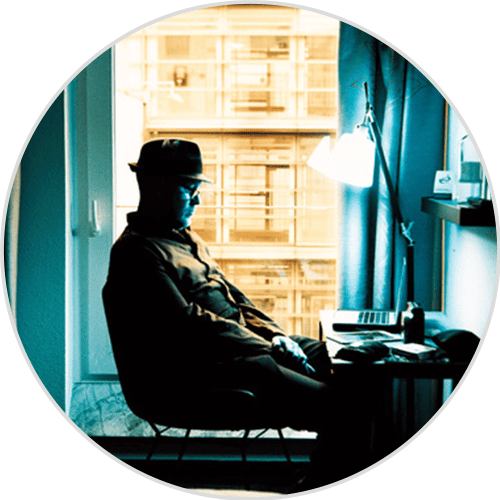
For these two images in Stuttgart, I had two shots left in the morning before flying, so I used my hotel room for a shot outside the window (with the windows open) and a self-portrait of myself.
The first image is a little bit brighter than I wanted but it picks out the levels of the car park well.
For the self-portrait, I was able to meter the shot because there was enough light in the room to measure the light on me. Outside the windows were fairly lit up, too, so I allowed for a three second exposure at F11 to get as much detail as I could. If only I had held my stomach in!


Another comparison can be seen from these images taken in Bath:
On the first image, the carousel is far away but there’s still some light pouring in from the surrounding buildings lighting up the colonnades.
I lucked out with two people deciding to stand or appear in shot.
For the second image, you can see more light helping to light the dark sky and the pavement from the buildings surrounding the carousel. Waiting for the carousel to start and timing the length of each ride was also a learning point – take your time, compose, and only when you are ready take the shot.


More Mistakes and More Lessons…
A Holga is a more difficult prospect when it comes to night photography.
Another very big mistake – which I won’t repeat again – was forgetting to change to Bulb mode when shooting with the Holga 135 Panoramic camera. I spent a lovely evening photographing Cromer pier only to realize my error later as I lay awake later in the hotel room that night!
But again, the few that did come out highlight what will come out at 1/125 second whilst using an 800 ISO film.
The neon and the no-entry sign were both captured successfully. I went back the following morning with a Holga 120N, but the cinema’s lights were turned off.


Related: Long Exposures on the Holga 120N
If you have got this far, you’ll have learned that I am a clumsy photographer.
Helicord (@helicord _camera) make versions of the Holga 120N and 120PAN with wi-fi shutters and a wider set of shutter speeds which take the fiddle out of using a shutter release cable. I still managed to move the focus to “close up” on the Holga instead of Infinity!
However, the following three images came out perfectly for me. The night got progressively darker as you can see from the order of the shots, but the lights on the pier again helped to light up the scene.
All images were shot at F8, and the first image was for 2 seconds, the second for 6 seconds, and the third for 8 seconds.


Lastly, getting up at half-past five is something I rarely do, but I was on a work trip and the hour and a half before breakfast is something I can recommend.
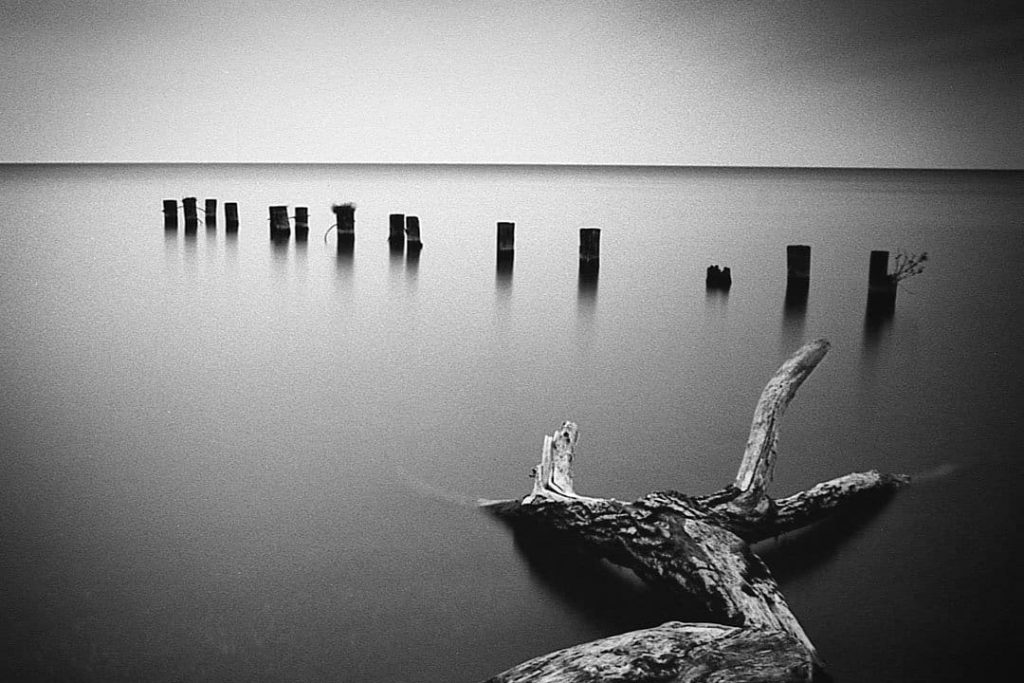
I’d shot the lighthouse the night before and it was pitch black. It was also very very windy, so much so that the tripod fell over!
The resultant image is a little shaky, and I put this down to the windy conditions, but again it demonstrates how much time is needed. This is a two minute exposure:

The following morning’s sunset was stunning, and I’m pleased to say I was able to capture it and the beautiful sky on Kodak Gold.
The light by this point (it was still incredibly windy), was sufficient that I was able to meter the image.

The second shot was my final mistake – and one that I am happy with. I either took the same shot again (having forgotten to wind on) or the wind meant I couldn’t be sure that I’d taken the shot!

In conclusion, I hope my mistakes and successes have helped give you the push to take your camera and tripod out for some long exposures. Remember:
- Take your time
- Check your camera is on Bulb!
- Compose
- Add a second or two if you are having doubts at the length of your exposure.
- Enjoy it.
- Check everything again!

Thank you so much, Alec! Alec is a regular contributor here at Shoot It With Film, and be sure to check out his other articles, like How to Shoot Holgaramas and Creating Holga-Roundas: A Multiple Exposure Holga Experiment.
You can also check out more of his work on Instagram.
Leave your questions about shooting long exposures on film at night below in the comments!

Leave a Comment
Shoot It With Film on Instagram


Blog Comments
Taylor Blanchard
January 26, 2024 at 11:52 am
I love this article Alec! I also love hearing that you make the same kinds of mistakes that I sometimes do, such as forgetting to put the camera in bulb mode. What a great idea to carry around a card (or even simply block the lens) if there are car headlights or other unexpected lights.
Anthony Marsh
January 26, 2024 at 12:28 pm
The article is relevant only to the extremely few who shoot the film used.
Gary
January 28, 2024 at 2:05 am
I like shooting with film as much as the next person, and the author presents some nice shots. However, I can’t for the life of me understand why one would take night shots on film rather than digital. Images can be reviewed instantly, “mistakes” can be deleted, and adjustments made at the scene without wasting expensive film. Night shots are by their nature experimental and I wouldn’t want to wait until the film is processed to see whether or not my experiments were successful.
Timothy Hastings
January 31, 2024 at 8:34 am
I disagree, Gary, that night photography is inherently experimental. It certainly can feel that way at first, but I note that you put quotation marks around “mistakes” and not around “wasting.” Try thinking of it the other way around; failed attempts (mistakes) aren’t wasted if they teach you what to do better the next time.
Night photography is challenging, for sure, but better equipment (faster lenses, faster films, a more sensitive meter, maybe [ahem] a heavier tripod) can help. Most of all, experience (and taking careful notes) can remove some of the guesswork. But the rewards can be great; take a look at Brassaï’s work in “Paris by Night.”
Digital is great, and sometimes the results are dazzling; it’ll always be quicker, easier, and cheaper than film. A digital camera, if nothing more, can be a terrific exposure “meter,” as Polaroids used to be used in the old days. But film has a certain reality that digital doesn’t. I call it verisimilitude but that’s not quite the right word. Digital truth is becoming ever-more questionable now that AI is creating pictures out of whole cloth, setting aside the technical and aesthetic advantages and drawbacks.