
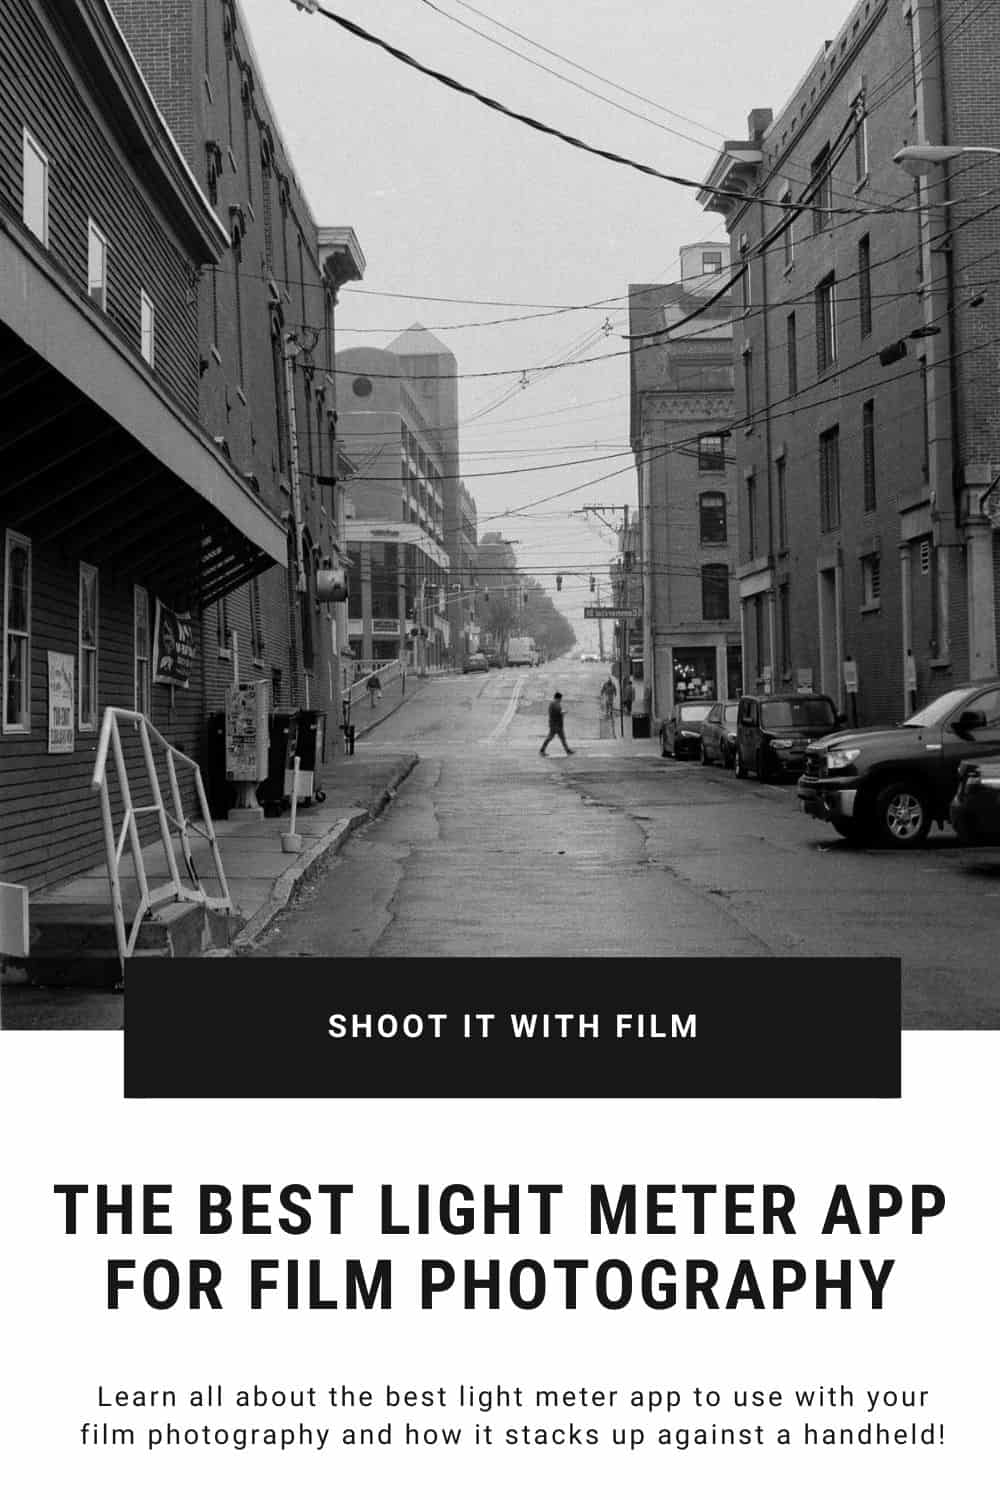
Written by John Adams III
Metering is the cornerstone on which any good photograph is built.
You can take a photo of the most stunning landscape or a portrait of the most captivating subject you’ve ever seen, but if the image isn’t metered correctly, the end result may not turn out how you intended.
When I first began to use fully manual film cameras that didn’t have a built in light meter, I immediately realized how essential a light meter is.
I took the in-camera meter for granted when looking through the viewfinder of my Canon AE-1 and Elan IIe, and was like a fish out of water when I moved on to other cameras.
Fortunately, metering light is very easy to do.


Using a Handheld Light Meter
My first handheld light meter was the Minolta Auto Meter IV. Super compact and easy to use, the Auto Meter did not have many bells and whistles and did exactly what it was intended to do in a straightforward way – meter light.
You can read more about some great handheld light meters for film photographers here.
I ended up selling it a few months after purchasing it, and I’ll tell you why: I kept losing the thing.
Between packing my camera, the lenses, the film, a spare battery (and making sure I had the transportation trifecta: phone-wallet-keys), I didn’t like having to keep up with another piece of equipment.
To that point, I’ve owned two Minolta light meters in the past because I lost one while shooting and had to purchase a replacement.
See what I mean?

Experimenting with Light Meter Apps
I began looking into more convenient solutions and soon learned that there are multiple apps out there that turn your cell phone into a functioning light meter.
Now, I was very skeptical at first. Hand held light meters by the likes of Minolta (find on eBay) and Sekonic (find on Amazon) are tried and true technology that have been used for decades. How well could my phone actually perform as a light meter?
After downloading a few apps and deleted those that just didn’t feel very user friendly, I happened upon myLightMeter Pro, or MLMP.
myLightMeter Pro is available in the iOS App Store for $3.99, and the developer also made a similar app for Android, but it is not quite as feature rich as the iOS version.


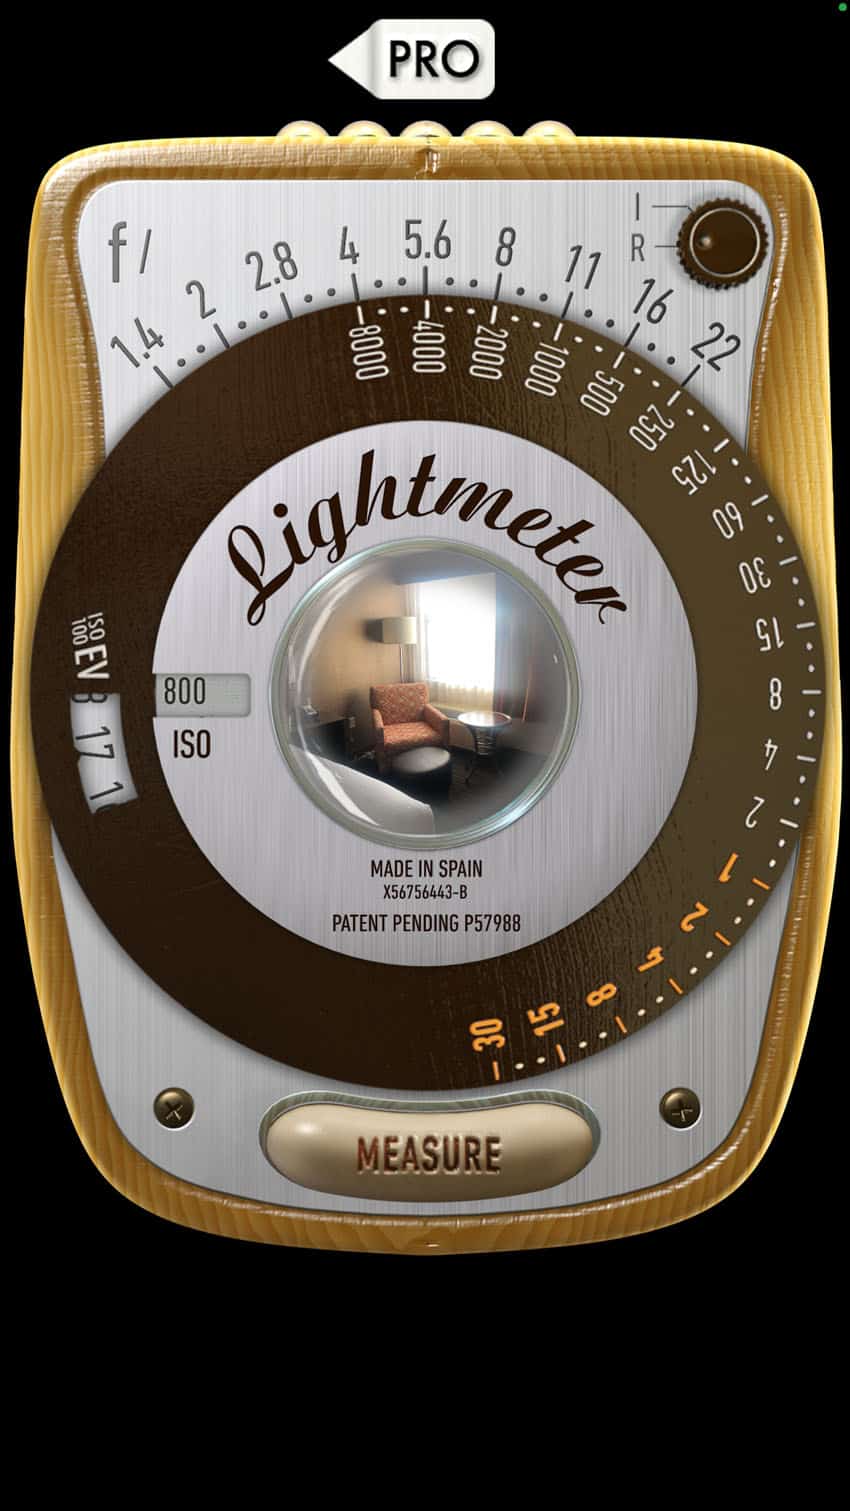
The myLightMeter Pro App
My Light Meter Pro is the easiest to use and most streamlined light meter application I have used thus far, and is extremely reliable.
This app has been my companion on every shoot I’ve done for the last year or so and has been the best light meter app to use for my film photography.


Using myLightMeter Pro
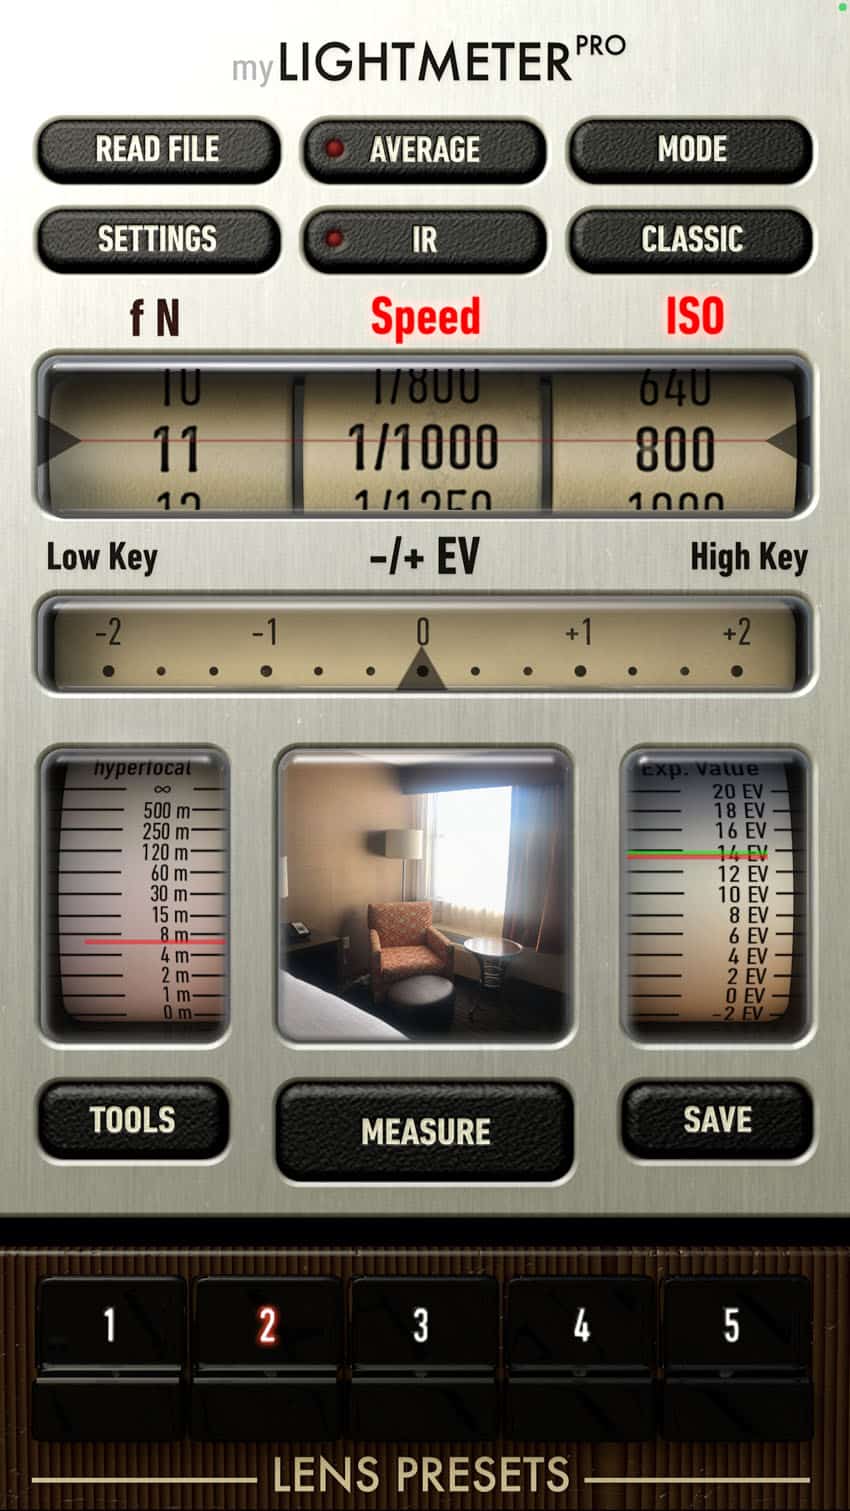
When you first open the application, you’re greeted with the main screen, where you can input your desired shutter speed, aperture, and the speed of the film you are currently using.
There is a screen beneath your exposure options that you can open to spot meter a scene.
In practice, you can tap the screen, point your phone’s camera toward the subject you want to properly expose, hit measure, and MLMP will do the work for you showing an accurate exposure value.
Below the shutter speed, aperture, and ISO dials, you will find an exposure compensation slider which allow you to over or underexpose your scene as you like, in an easy to use way.

Save Your Settings
Beneath the exposure value window on the right side, you will see a Save button, which allows you to save the exposure readings of a particular scene to your phone, which is a really cool function.
Say you’re shooting in a particularly unique lighting situation and you’d like to remember how to meter it in the future, meter the scene within the app, hit the save button, and you’ll now have documentation of the proper exposure for that scene.
This can be great for learning how to read light or to maintain consistent results.


Lens Presets
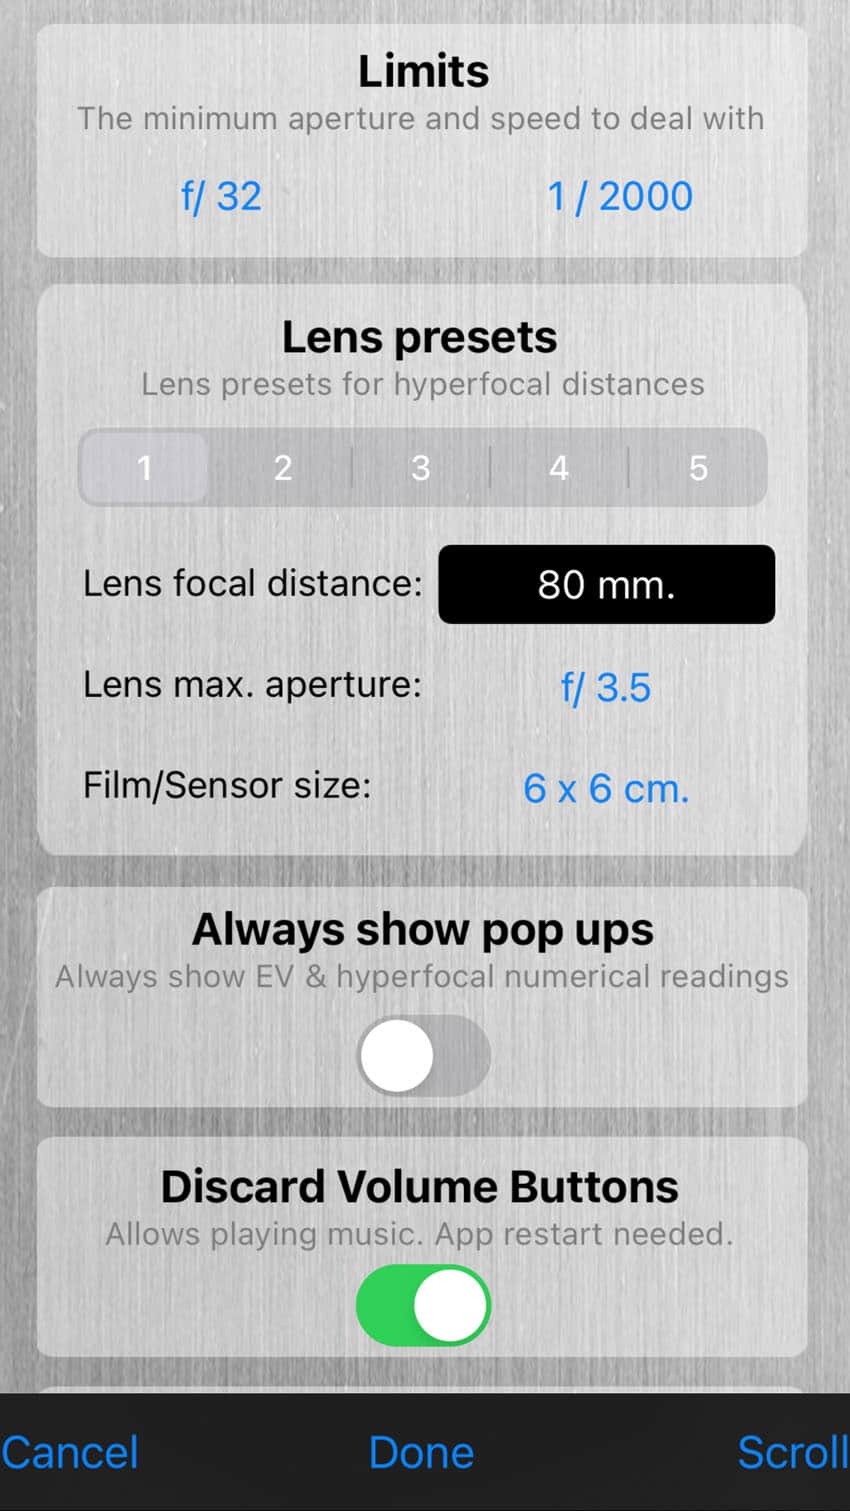
The buttons numbered one through five at the bottom of the screen are lens presets which allow you to tell the app when you’re shooting with different lenses.
This is a big help if you jump between formats like I do.
For instance, my Pentax MX usually has a 50mm 1.4 lens on it, whereas my RZ67 typically has a 65mm f4 – it does no good if the app suggests that I shoot wider than f/4 on my Mamiya, which can only go as wide as f4, or if it thinks I can’t go wider than f/4 on my Pentax which can open up to 1.4.
So, having different lens presets for each of your cameras helps in a big way.
You can customize yourself lens presets by selecting Settings on the main page of the app.

Layout Settings
The Classic button on the top right side of the application switches the layout of the light meter to a classic Sekonic dial-style meter.
The functionality is the exact same as the regular Pro layout. However, I tend to like the Pro version better as I find it a bit more user friendly.
This mode is also the layout for the non-“Pro” version of the app. You can switch back to the Pro mode by selecting Pro at the top of the screen.
Spot Metering with myLightMeter Pro
MLMP works great as a spot meter.
I believe it does have functionality as a reflective meter, but I haven’t tried it out yet. (You can access that function by selecting Mode on the top right hand side of the main screen though.)
This is how you would meter a scene while out and about with your camera.
- Open the app and begin by inputting the desired ISO you wish to shoot at. Shooting some Ektar 100? Input 100. Rating Portra 400 at 200? Input 200.
- Tap the viewing screen in the center of the app to open your camera.
- Tap the area on the screen where you wish to meter, and then select Measure.
- The app will calculate the f-stop and shutter speed you should shoot at in order to achieve a proper exposure.

Using MLMP in Tricky Lighting Situations
myLightMeter Pro is great but it isn’t perfect.
It can get tricked by heavy contrast within a scene (think streetlights on a dark street). I’ve found that it helps to get as close to what you’d like to meter for as possible, so as to avoid accidental metering of light you don’t need in your frame.
For example, if you’re metering for the highlights of a scene, try and fill your camera with the highlight area and then meter. This will limit the chance you confuse the app and make sure you’re metering for exactly what you’re trying to meter for.
If you are shooting in a scene with heavy contrast, MLMP has an Average function which, when turned on at the top of the screen, allows you to meter for two separate areas and get an average, middle reading of the two areas.
This is very useful if you want to preserve some shadow detail in a scene but don’t want to completely blow out the highlights.


My Metering Technique
Metering matters! There’s a million and one ways an image can come out simply based on where you metered in a scene (Please check out Amy Berge’s awesome article on metering.)
I tend to meter for the brightest part of my subject’s face or skin when shooting portraits, this is simply to avoid the skin coming out too bright or blown out.
I know that many suggest you meter for the darkest part of the scene, which I sometimes do, but this metering technique has been reliable for me in the past.


Final Thoughts
Whipping your phone out every time you want to meter something can get a little annoying and some may argue that having a dedicated meter is a far superior option.
I really think that, being something that’s already in your pocket, the reliability and functionality of myLightMeter Pro is worth the small annoyances it may bring.
myLightMeter Pro is a powerhouse of an app, and at $3.99 is a no brainer (for comparison, Minolta light meter cost me $150!).
The results this app delivers speak for itself, as does its convenience, being in your pocket at all times. It’s the best light meter app I’ve found for my film photography
The next time you find yourself in need of a light meter for your photography, I highly recommend giving this app a try – you may be surprised at your results!

Thank you so much, John! John is a regular contributor here at Shoot It With Film, and you can check out his other articles here, such as a review for the Mamiya RZ67 and a tutorial for using flash with film. You can also check out more of John’s work on his website and Instagram.
If you have questions about using a light meter app, leave them below in the comments, and you can find the myLightMeter Pro app on Apple App Store here.
Check out all of our film photography tutorials here.


Leave a Comment
Shoot It With Film on Instagram


Blog Comments
Christian Morrison
April 16, 2021 at 11:30 am
Great article. I worked my way through a couple of smartphone apps when I finally landed on MLMP. I’ve almost entirely stopped using my Seconic. It’s a hand app, affordable and always with you (have phone will measure light).
John
April 16, 2021 at 10:05 pm
I agree man! It’s a truly amazing app and blew my Minolta meter out of the water. Thanks for reading, cheers!
Marcin
April 16, 2021 at 5:26 pm
I love the MLMP! The best app for iPhone and really easy to use.
Daniel
April 18, 2021 at 11:11 am
Hi there, thanks for the article! For iOS users I cannot recommend LightMe enough. It is a fantastic app, very well made, tons of features.
Bruce Heyne
April 18, 2021 at 7:39 pm
I’m not one who normally endorses products, but MyLightMeter works great. I’ve been using it for a couple years since my beloved Zone VI modified Gossen Luna Pro died. It has proven unerringly accurate and is good enough to check other meters, including built in ones, against it
Jen Stamps
April 21, 2021 at 4:02 pm
This is so helpful, John! I don’t have a handheld meter. I have an app, but don’t love it. I just downloaded this app and I’m excited to give it a try. Thanks for sharing your experience with it.
Dylan Dean
April 28, 2021 at 9:35 pm
Thank you, John! Simply one of the best articles I’ve read on this. I have a pricey Sekonic meter but found the UI on the MLMP so much easier, and it’s wicked accurate. I also like that I don’t have to carry another piece of equipment to a location.
TS
May 10, 2021 at 8:08 pm
The IOS versions may work well, but the android version you mentioned, as well as others, don’t work with some phones, Galaxy S10 is one. I actually bought it before I found out it doesn’t work on my phone. So still carrying around my GLP, will see how well LMP works when I get around to upgrading to a newer phone.
shootitwithfilm
May 10, 2021 at 8:11 pm
TS, thank you! This is so helpful!
ERIK
May 13, 2021 at 6:27 pm
I tried almost every light meter app on the play store and none of them seemed to meter correctly, at least compared to known good readings in my digital camera. The apps were very inconsistent and I fear that relying on them is less likely to provide accurate exposure than just using the sunny 16 rule. Negative film is pretty forgiving though. I don’t know if the issue is my phone (oneplus 7t) user error or just not accurate algorithms in the apps.
Looks like your experience is better – perhaps the iPhone sensor is just superior and gives accurate results.
Orlando J Lopez
August 11, 2021 at 2:27 pm
The $3.99 cost is that a one time expense or a monthly fee? If one time, it stays loaded in your phone for future use, no additional cost?
shootitwithfilm
August 11, 2021 at 4:21 pm
Hi Orlando! Yes, the cost for MyLightMeter Pro is a one-time payment of $3.99, and then the app will stay on your phone for future use.
Mike Myers
September 20, 2021 at 6:57 pm
I opened the link to the app expecting to quickly get bored and move on. Instead, you made exactly the app that I would have liked to have bought. $4 is too little for the app – maybe $10 would be more appropriate.
I like everything about it. I’ll give it a try tomorrow. My digital Nikons already have great meters, but my Leica M3 has nothing, and my Nikon F4 has a very basic one – great for 25 years ago.
Thank you – this was a very pleasant surprise.
Brett Rogers
December 10, 2021 at 9:15 pm
“I ended up selling it a few months after purchasing it, and I’ll tell you why: I kept losing the thing.
Between packing my camera, the lenses, the film, a spare battery (and making sure I had the transportation trifecta: phone-wallet-keys), I didn’t like having to keep up with another piece of equipment.”
All very well but I think you’ve fallen for a logical fallacy. If you can lose your meter, you can lose your phone (or your camera, for that matter).
If you just don’t like carrying a light meter, that’s fine, it is, after all, what works for *you*, not what works for me. But you can potentially lose anything. The trick is, not to. If you can not lose your camera, phone, keys, or wallet—respectfully, I suggest—you can, also, not lose a light meter *if* you decide not to…
jdcallow
March 8, 2022 at 8:42 am
Excellent article, supported by well exposed, nicely composed and visually interesting images. MLMP is DLing as I type. I hope you are getting more than nice words and pats on the back for your efforts.
Troy Phillips
April 7, 2022 at 9:49 am
I have been using this light meter on my phone or the Sunny 16 rule . I haven’t developed the film as of yet with the Light Meter app . It is so simple and convenient I hope my results are good .
What a great article and explanation of the use of the app thanks so much
Tro
Paul Verizzo
June 26, 2022 at 9:49 pm
First, great photographs! Wow! Speaking as a third generation published photographer and invited to galleries.
Your comment about trying it out as a reflective meter doesn’t make sense. That’s exactly what it is, 100% of the time.
Your hand held Minolta offers the ability to read incident light. The amount of light falling on the subject. It requires a translucent dome that picks up not only light shining down, but also what might be reflecting from the ground. This is the metering that cinema photographers use, for very good reasons.
bk moorthy
November 24, 2022 at 4:07 am
wonderful information
Ray Goulter
October 25, 2024 at 2:09 am
I know this thread is a few years old now, but I think John meant ‘incident meter’.
I carry my trusty Gossen Profisix everywhere and regularly take an incident reading and several reflective measurements before shooting, but this article has prompted me to check out the light meter app mentioned. Note the app indicates readings for hyperlocal distance (lens set to infinity), so some adjustment is needed if the lens is racked out to a closer focal distance – particularly so in the case of LF cameras. I wonder if the iOS app can be set to measure off the ground glass screen of a LF camera? That would be particularly handy as it would give actual light intensity readings no matter how far the LF lens is racked out for short focal distances! If the app could also measure for flash exposures I could just about dispense with my Gossen Profisix (Lunasix in USA). Great article!
‘There’s always more to learn about photography’.
Andreas
December 1, 2024 at 4:12 pm
Just found your article. Thank you for a great review. Downloading MyLightMeterPro not only saved me quite a bit of money but also gave me a product superior to the little hot show meters I had considered.
Michael
October 22, 2025 at 2:49 pm
Just found this page and found the information useful. I’ve downloaded the app and will use it with my M645. I used to use a Gossen handheld (cheap) light meter. It dates – like my camera/lenses – to 1979! I am the original owner. I’m now almost 70 years old and am heading to Mono Lake and Alabama Hills, CA beginning tomorrow morning. Solo trip for some of it. Should be fun! Thanks for the info. I’ll follow you on social media.