
Written by Jen Golay


It’s finally spring! That means the birds are building nests, the sun is shining, and the flowers are beginning to bloom.
One of my favorite things to photograph has always been the flowers in my garden. Not only are they beautiful, but they stand still (for the most part), don’t complain or ask me to hurry up (like my kids do), and they are constantly changing (while staying exactly the same).
It’s impossible to think of floral photography without imagining beautiful close-up, macro images. But macro lenses are expensive, and whether you’re just starting out or are a seasoned pro, it’s often hard to justify spending hundreds of dollars on a specialized lens that has only one use.
There are ways to create macro photography and close-up images without a dedicated macro lens that are much less expensive and much more portable. I’m going to share three of those ways here as well as an overview of macro photography and the benefits and drawbacks of using a macro lens.
While there are lots and lots of things that you can photograph on a macro and close-up level, I am going to focus on floral photography. So, let’s jump into the world of macro floral photography!

What Does a Macro Lens Do?
Before we take a look at macro photography without a macro lens, let’s look at macro lenses and what they do.
First, let’s define macro. The simplest definition of macro photography is that the image is life-sized.
Macro photography works in a world of ratios comparing the magnification of the lens to the size of the object photographed.
A true macro lens and image has a ratio of 1:1, meaning the image on film is the exact same size as the object photographed.
For example, if you photograph a flower that is one centimeter in real life, the image will take up one centimeter on film, regardless of the size of your film (35mm or medium format).
A 1:2 ratio means that the image on film is half the actual size. Anything less than one tenth magnification (e.g. 1/15th magnification) is not macro.
Macro lenses can also have a magnification greater than life size. Some lenses have a 5:1 ratio, meaning the image on film is five times the size it is in real life.

Macro Lenses and Focusing Distances
One big difference macro lenses have from regular lenses is their minimum focus distance.
Macro lenses let you get much closer to the object you’re shooting, thus enabling the image to be the same size as the object.
Macro lenses can have different focal lengths: short (35-60mm), intermediate (90-105mm), and long (150-200mm).
Each of these has different minimum focus distances. The shorter lenses have the shortest minimum focus distances and the longer lenses have the longest minimum focus distance.


Flat Focus Field
Macro lenses also have a flat focus field, rather than the curved focus field of a regular lens.
Todd Vorenkamp at B & H explains the difference: “With a curved field lens, the center of an image is in focus while the edges are soft(er). This softness is usually compensated for by using aperture to adjust your depth of field, but the effect is magnified when photographing at very close distances and when photographing two-dimensional objects. The flat field of the macro lens is designed to allow the entire image to be in focus without increasing the depth of field.”
Benefits of a Dedicated Macro Lens
The benefits of using a dedicated macro lens include the smaller minimum focus distance, the sharp focus, and the buttery bokeh.
Having a smaller minimum focus distance allows you to get up close and personal with inanimate objects like flowers to photograph their beautiful details.
Macro lenses are designed to have a sharp, crisp focus to see all of those details clearly. Using a macro lens with its wide aperture renders the background as a creamy contrast to the magnified sharpness of the focal plane.

Drawbacks
The drawbacks of a dedicated macro lens are the expense, the size and weight, image stabilization, manual focus, and the short working space.
Macro lenses range in price from $400 to $900 new (find on Amazon). Fortunately, film shooters can find less expensive older lenses for $150 to $250 (find at KEH Camera), but that is still quite expensive for a good-sized lens to lug around to only shoot close-ups.
Macro lenses aren’t compact. Most photographers find that a 105mm lens is best for their use—long enough for good magnification without casting shadows, and light enough to be hand-held, but they are still hefty in size and weight.
Macro lenses not only magnify the object being photographed, but they also magnify movement, so image stabilization can be an issue. Newer, more expensive lenses can compensate for this with built-in image stabilization, adding to the price tag.
Auto focus on newer macro lenses is available, but it can be finicky, so shooting with a dedicated macro lens will require manual focus abilities. All older lenses are manual focus only.
While a closer minimum focus distance is one of the benefits of a macro lens, it can also be a disadvantage. If you’re working with a shorter focal length and very close to your subject, you may find that you or your lens cast a shadow.
Also, if you want to shoot living things like small creatures and insects, you’ll want a longer focal length with its longer, but still close, minimum focusing distance.

Alternatives to Using a Macro Lens
So macro photography and lenses can be great for super-sharp close-up images, but not without a bit of effort and expense.
So how can you get these great images with less effort and in a budget-friendly way?
Let me show you! You have three options that are less expensive, take up less space, and require less effort: extension tubes, close-up filters, and a reversing ring or reverse freelensing.
But just to be clear, note that these three methods generally do not technically equate to macro photography, but they are a great way to get some experience with close-up, macro-like photography without the investment of a macro lens.

Extension Tubes
Extension tubes are a great alternative to a macro lens for close-up photography. An extension tube is simply a hollow tube that is placed between the camera body and the lens to increase the distance between the lens and the film, which makes it possible to focus closer to the subject.
The benefits of using extension tubes include a cheaper price tag, stacking multiple tubes for versatility, and no added glass to degrade the image quality.
Extension tube sets range in price from $10 to $150. When shopping for a set of extension tubes, keep in mind the type of camera and camera mount you have and purchase a set that matches. (Find extension tubes on Amazon)

Extension tubes are usually sold in sets and may be combined or “stacked” for an even greater distance in focal length.
Shorter focal length lenses will have greater magnification than telephoto lenses.
Because extension tubes contain no glass or lens, there will be no chance for a loss of image quality, so your image will be as good as the lens attached to it.

Extension Tube Disadvantages
There are a few disadvantages to extension tubes: reduced exposure, loss of camera/lens communication, and loss of infinity focus.
Because the extension tube adds distance between the lens and the film, less light will be able to make it to the film, so you’ll need to add a stop or two to your exposure.
Some of the less-expensive models are literally just plastic tubes, so the electronic connections between your camera and lens will not operate, turning your lens into a completely manual lens. This may be a problem if you don’t have an aperture ring.
Extension tubes prohibit the ability to focus at infinity, so they limit your lens while you use them and must be removed if you want to go back to normal shooting.

Close-Up Filters
Close-up filters are an even less expensive option than extension tubes.
They are a set of filters that screw on to the end of you lens and are essentially a magnifying glass for your lens. They come in sets: +1, +2, sometimes +3, +4, and sometimes +10.

The benefits of using close-up filters for your close-up photography include price, portability, flexibility, and full lens functionality.
Close-up filters range in price depending on the size of the filter. A 58mm set can go for $40 while a 77mm set is about $120. Choose a reputable brand like Tiffen or Hoya. They usually include a filter pouch, which makes this option smaller and lighter than a macro lens or a set of extension tubes. (Find close-up filters on Amazon)
Close-up filters can be stacked in various combinations to yield more magnification. And because they go on the end of the lens, your lens retains all of its electronic functions.
Disadvantages to Using Close-Up Filters
There are a few drawbacks to close-up filters: lower image quality, lens size variation, and less magnification.
Close-up filters add another layer of glass, often of lower quality, between your subject and your film and can lower the image quality by softening the focus and adding chromatic aberration.
Because lenses vary greatly in size, you’ll need a set of filters for each size of lens you want to use them with.
Close-up filters do not magnify as much as extension tubes or a macro lens. And like extension tubes, close-up filters only allow close-range focus and must be removed to focus at farther distances and infinity.
Because close-up filters are relatively inexpensive, I have a set for every camera system I own so I can always get close-up shots.

Reverse Freelensing
The least expensive way to create a macro image is to reverse freelens or use a reversing ring.
Like extension tubes and close-up filters, this can be done with any lens already in your camera bag and, at its most basic level, is absolutely free.
All you have to do is remove your camera lens and hold it in front of your camera backwards, shooting through the front element.

If your hand isn’t that steady or you don’t want to risk getting dirt inside your camera, you can purchase a reversing ring that mounts on the threaded filter ring of your lens and then attaches to your camera.
You’ll need a camera brand specific reversing ring.


The biggest advantage to this method is price range: $0 to $9.
The biggest disadvantage to reverse freelensing or using a reversing ring is exposure of the delicate internal parts of your camera and the rear element of your lens.
You can protect your camera by using a reversing ring, and some reversing rings come with a part to protect the lens rear element. You can also attach an extension tube and use it like a lens hood.
The best lenses to use with this technique are prime lenses with manual focus and an aperture ring.


Close-Up and Macro Photography Tips
So now that you’ve got your gear sorted, it’s time to take some macro or close-up floral images.
There are a few things you’ll want to know about when shooting with a macro lens or with one of the other close-up options.

Composing Your Image
One of the first things you’ll notice when getting up close and personal with flowers is that they are bigger than you thought!
There is actually a lot of space and things to see, so you’ll need to decide what you’re going to focus on.
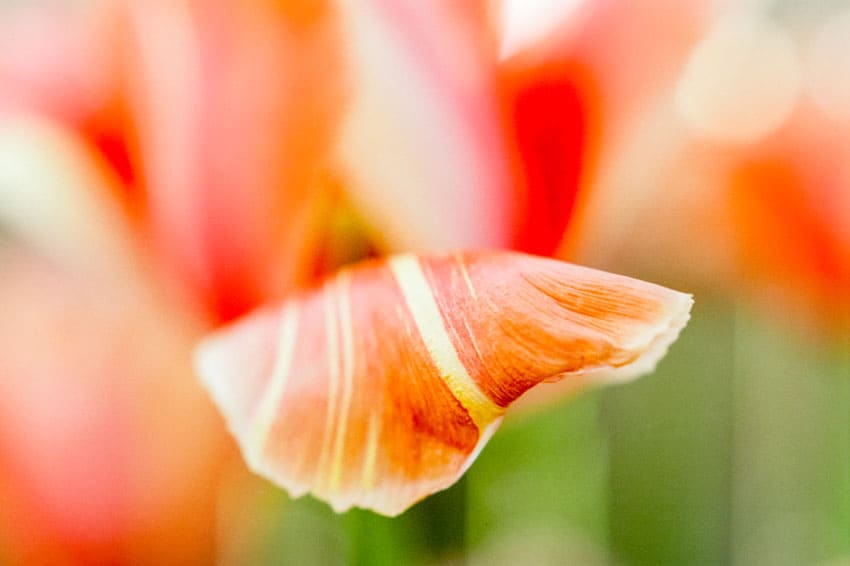
Sometimes this can be a tough choice, so I often take multiple images with differing focus points. I like to choose something crisp like the center stamen or seeds. The eye is naturally drawn to the center of the flower, and it can be jarring if it’s out of focus.
This doesn’t mean that you have to place your focal point in the center of the frame.
Another great place to focus is on the edges of petals or leaves. That sharp line draws the eye and contrasts beautifully with the luscious bokeh of the rest of the image.
Focusing
When you’re shooting anything close up, you’ll discover quickly that your autofocus goes berserk trying to decide what to latch on to, so it’s best to switch to manual focusing.
You’ll also notice that small adjustments on your focus ring produce big changes.
I’ve found that it’s almost easier to move the camera back and forth (when shooting handheld) to find focus than it is to adjust the focus ring.
To do this, I turn the focus ring to its minimum focus distance, and, as I look through the viewfinder, I move back and forth and sometimes side to side to fix my focus.
A bonus to this method is that as you move, you’ll see different things in focus and may be inspired to focus on something better than your original intention.

Depth-of-Field, Aperture, and Sharp Focus
While you’re focusing, you may notice that you have a very narrow depth-of-field when shooting macro or with any of the close-up methods discussed earlier.
Generally speaking, depth-of-field depends on three variables, aperture, focal length, and distance from the subject. But with macro and close-up photography, there are really only two variables: aperture and magnification. The greater the magnification, the narrower the depth of field.
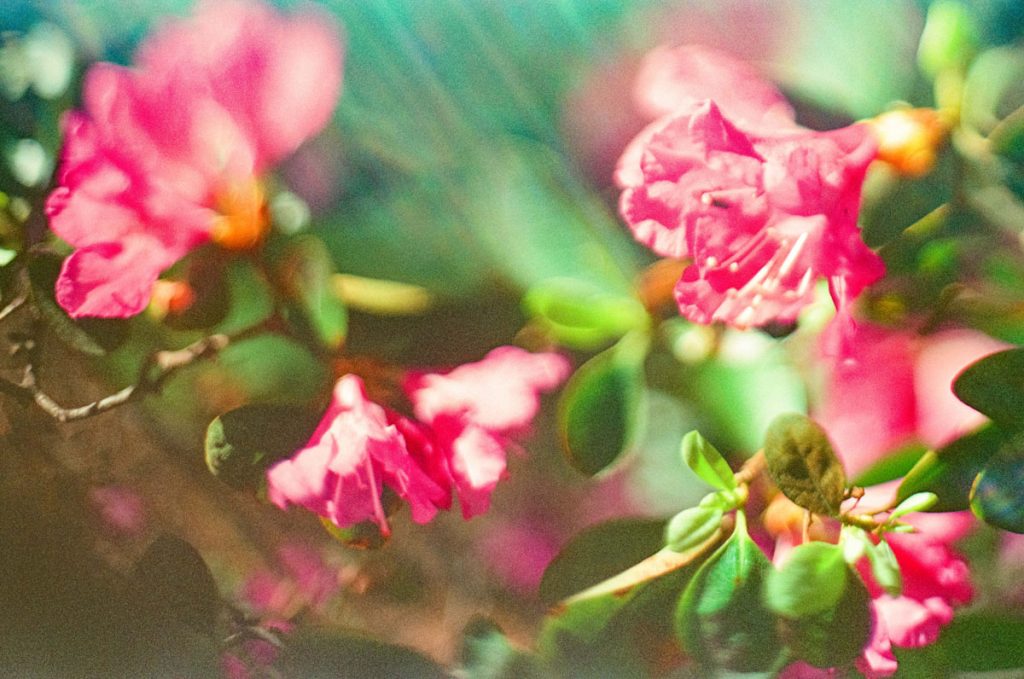
One of the greatest characteristics of close-up photography is the contrast between what is in focus and what is not, and, usually, to get that buttery bokeh, you would open up your lens as wide as you can. If you do that with a macro lens or any of the alternative close-up methods, you’ll discover quickly that trying to get a sharp focus is maddening!
Photographers new to macro are surprised to learn that a lot of macro shots are stopped down and that f/11 looks more like f/2.8 on a normal lens. With the alternative macro methods, I don’t stop down that much, but they are often at f/4 to f/8.

Finding Good Light
If you are shooting macro or with extension tubes or close-up filters—all of which decrease the amount of light reaching your film—you’re going to need good light.
When I photograph the flowers in my garden or at a public garden, I try to do it early afternoon when the light is the brightest.
But that doesn’t mean I shoot in full sun. As in all photography, directional light is the most beautiful and interesting, so I take my cut flowers into open shade and look for the angle with the best directional light.
If I can’t move the flowers, I create my own directional shade using a 12” diffuser or reflector to create directional light. Some macro photographers work with a diffused flash or video light, but I prefer to keep my set-up as simple as possible.

Accounting for Air Movement
Lighting isn’t the only shooting condition you’ll need to take into consideration when shooting flowers close up.
You know that the slightest movement of the camera can change your focus point with the shallow depth of field in macro images, any air movement will do the same.
Even on the calmest days, the air current from your own movement can make your flower move slightly, changing your focal point.
To prevent this, do your macro floral photography on a calm day. Consider using a tripod. Use a plant clamp (plamp). Or block the wind with your body or a reflector.

Using a Tripod
When you’re working with such a shallow depth-of-field where even the most minimal of movements can change your focus plane and a lens or modifier that requires a lot of light, you might find using a tripod comes in handy.
A tripod keeps your camera steady to maintain your focus and it permits you to use longer shutter speeds if lighting is not ideal.
If you choose to use a tripod with your floral close-ups, choose one that can get really low to the ground. Some travel and landscape tripods have this capability. I tend to just use my little Gorillapod.

Experiment with Framing and Angles
I think the thing that makes up close flower photography always interesting is that it’s impossible to take the same photo.
I shoot the same flowers in my garden year after year, and each time, I come away with something different. There is always different light, a new angle, a fresh perspective.
When you begin to frame your image, focal point is the most important part of the image because the eye will automatically be drawn to the sharpest part of the image. The next important element is good light. And the final ingredient to a good flower image is framing and perspective.
Use good composition techniques like the rule of thirds, leading lines, S-curves, a distraction-free background, symmetry, creating depth, diagonals and patterns, odd numbers, the golden mean, filling the frame, negative space, and balance.
Look for different angles from which to shoot. The most obvious is from above, but don’t forget to look at the profile of a blossom.
Some of my favorite flower images are from below. Don’t be afraid to get down on the ground and shoot through foliage.
And finally, remember to shoot in all seasons.


Medium Format Macro Photography
You can create lovely macro and close-up images with either medium format or 35mm.
Medium format macro lenses are rather rare and expensive, so for my favorite medium format cameras, I use extension tubes and close-up filters.
Close-up filters are the easiest to find, but you can find proprietary extension tubes for different medium format camera systems on eBay.
Note that magnification will appear to be less with medium format film because the negative is larger than 35mm film. If you’ve ever been a digital photographer, this is analogous to the difference in “magnification” between a cropped sensor and a full-frame sensor.

Final Thoughts
Macro and close-up photography with flowers is always interesting, beautiful, and popular. If you want to dip your toes into the world of close-up floral photography without the investment in a dedicated macro lens, give reverse freelensing, close-up filters, or extension tubes a try.
And don’t forget to look at other things from a macro perspective, too!
I can never see too many floral images, so I’d love to see what you create with any of these techniques. And don’t forget to reach out with any questions or comments you might have about macro floral photography.

Thank you so much, Jen! Jen is a regular contributor here at Shoot It With Film, and you can check out her other articles here, including How to Shoot Kodak Gold 200 and Olympus Pen F Half-Frame Film Camera Review. You can also check out more of Jen’s work on Instagram.
If you have questions about close-up and macro photography, leave them below in the comments! And you can pick up extension tubes, close-up filters, and reversing rings for yourself on Amazon!


Leave a Comment
Shoot It With Film on Instagram


Blog Comments
Graham
August 18, 2020 at 10:17 pm
Hi Jen,
I’m keen to get into macro photography with my Canon EOS 10 film camera, as a hobby. I have been looking at various lenses including the Iowa 100mm f2.8 2:1 Ultra macro, and the Canon EF 100mm f2.8 1:1 Macro. I don’t think I would get the quality or satisfaction with extension tubes
I would appreciate your advice about the problems I may face using the macro lenses with/without a tripod.
thank you in anticipation.
Jen Golay
August 20, 2020 at 3:33 pm
Hi Graham!
Thanks so much for your comment. I have a 105mm and a 60mm macro lenses. I find that I prefer the 60mm more because I can get closer to my subject. If I am shooting something that I can’t get close to–like a butterfly or an insect, then I’d choose the 105mm. Any movement with the longer focal length, whether by me or my subject, is greatly magnified. So I wold recommend a shorter focal length to avoid that. If that is not possible, or you really prefer the 100mm, be sure you can hold steady when shooting if you don’t plan to use a tripod. Don’t hold your breath. Keep your elbows tight to your sides. Lean on something solid. Prop your camera on something solid.
Finally, the only difference between the two lenses that you are looking at is their magnification. The first one has a ratio of 2:1, so it will render your subject half of life-sized on film. The second lens has a 1:1 ratio and will recreate your subject as life-sized on film. The first lens will magnify movement slightly less than the second lens. If you plan to shoot without a tripod, I’d choose the lens with the 2:1 ratio. If you’re a steady shooter or plan to use a tripod, choose the second lens.
I hope this is helpful to you! I’d love to hear what you choose and how you get on!
Bill Barker
August 27, 2020 at 10:08 pm
Bellows?
Rich
November 23, 2020 at 7:50 pm
A trick I learned a while back – if you have two lenses – is to put the longer lens on your, camera, and, reversing the shorter one, place it in front of the longer. There is a relationship between the two focal lengths and the magnification which I do not recall.
This was a cheap way to experiment with macros; if you like it, you can go for more hardware.
A tripod is almost mandatory for this.
–Rich
shootitwithfilm
November 23, 2020 at 9:09 pm
Such a great tip! Thanks, Rich!