
Written by John Adams III
Ever since coming across Amy Berge’s guide to scanning your own film at home, I’ve been a huge advocate for self scanning your film.
Scanning your own film allows you to have full control over the way your images look and takes a lot of the fear out of shooting film and “hoping your negatives come out well!”
If you look around online, you’ll find that there are a million people out there with a million different tips on the best way to scan film, from using a flatbed Epson scanner to taping your negatives to a window (yes for real).
I recently got a chance to try out Negative Supply’s new Basic 120 Carrier for digitizing your negatives, and I instantly became a fan of it.
Lets get into why.


What is a Film Carrier?
For those of you who are wondering what a “carrier” is and why you should care, let me fill you in.
When you scan film, you need something to keep the film as flat and secure and possible while you digitize it.
In both flatbed and DSLR scanning methods, some form of a carrier (or mask) is generally needed (although you could technically scan film directly on the glass without a carrier with flatbed scanners, but I digress.)
The Basic 120 Carrier from Negative Supply is designed for DSLR scanning medium format film.


Related: Scanning Film Negatives with a DSLR
The Design and Build Quality
The first thing you should know about this film holder is that it may be called “basic” but that doesn’t mean it’s a cheaply made or inferior product.
It’s made of a combination of carbon fiber and metal which makes it very sturdy yet not uncomfortably heavy.
The outside of the unit is covered in a leatherette similar to what you’d find on the outside of a guitar amplifier.
The hinge on this carrier is honestly what makes it so great. I’m not sure how exactly they engineered it, but the magnetic hinge manages to keep the negative completely flat while also loose enough so that the negative can be pulled through you advance frame to frame – without having to lift the hinge at all.
It sounds like a small thing, but if you’ve scanned film at home, you know how important keeping the negative flat is!

How Long Does It Take to Scan a Roll of Film?
This design makes scanning a roll of 120 stupidly quick. We’re talking less than two minutes here.
In fact, the longest part of the entire scanning process while using this carrier is making sure the first frame is in focus.
After focus is achieved, scanning is as simple as photographing each frame, pulling the negative to the next frame (with gloves!!) and capturing the next frame until you’re finished with the roll. I usually shoot 67 format, so I only have ten photos to scan in a roll.
Using cut rolls would most likely add time to the process, because you’d have to load in each separate strip. I find it’s more efficient to scan the negatives uncut and to sleeve them afterwards.

Anti-Dust Feature
Another feature I find pretty cool is that Negative Supply’s Basic 120 Carrier has small anti-dust cloth inserts in the top hinge that simultaneously picks up stray dust that may be lingering in your negatives and also prevent your negative from being scratched as you scan each frame.
Its not perfect, so I would recommend still using a anti-dust cloth or rocket blower to ensure your negative is dust free before scanning.
It’s a small feature, but speaks to the thoughtfulness of the design of the carrier.

My Digitizing Process
My setup when scanning with the Basic 120 Carrier is pretty barebones.
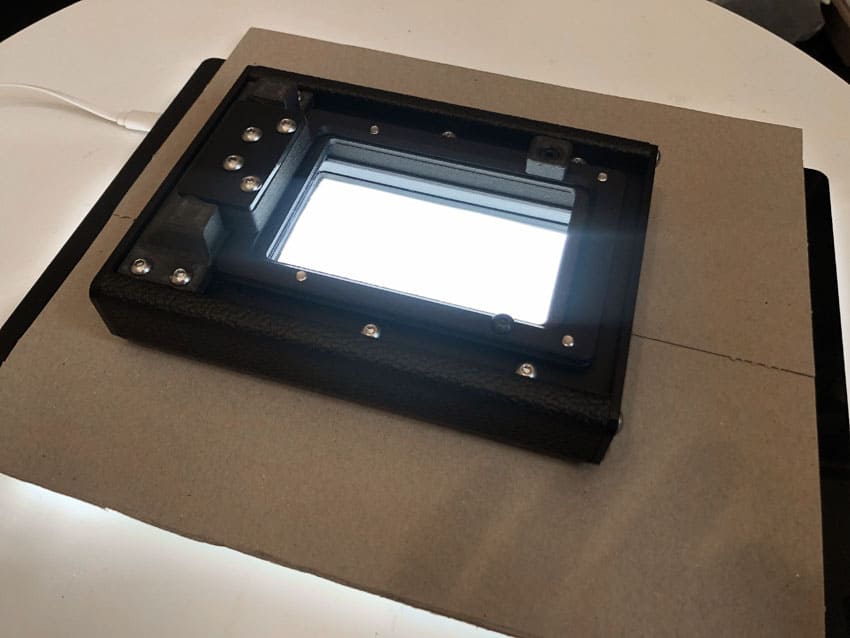
First, I turn on my Kaiser Slimlite light source to full power.

Next, I put my homemade mask over the light.
The mask is used to block out any stray light from the light source and ensure that only light from the negative is reaching your lens – I use a piece of cardboard with a square for the negative cut out in the center.

Thirdly, the Basic 120 Carrier sits atop the light and mask.
I then mount my digital camera to my tripod, position it over the carrier, attach the cable release, and that’s it!
I can now load in a strip of film and begin scanning.


Final Thoughts
Overall, this carrier is a great solution for anyone looking to begin DSLR scanning and are wondering where to start.
It’s a very simple device and does exactly what it claims to do. Making sure your negative is flat is the most important part of film scanning and this carrier does that – with the added benefit of being very fast.

Thank you so much, John! John is a regular contributor here at Shoot It With Film, and you can check out his other articles here, such as a 11 Amazing Film Photographers Share Their Best Tips for Shooting Film and the best light meter app for film photography.
You can also check out more of John’s work on his website and Instagram.
If you have questions about Negative Supply’s Basic 120 Film Carrier, leave them below in the comments, and you can pick one up for yourself on Negative Supply’s website.


Leave a Comment
Shoot It With Film on Instagram


Blog Comments
Ray Goulter
November 19, 2021 at 6:20 pm
John, An interesting article. I also use a similar method to scan 35mm, 120 Rollfilm (6×4.5, 6×6, 6×7 & 6×9) and 4″x5″. The negative carriers from enlargers also works well. I use my darkroom, similarly restrict any extraneous light so the only illumination is from the lightbox, an enlarger stem to mount the camera, 55mm micro Nikkor, and cable release with camera on timer. I use this system to copy transparencies. I note your article shows colour negatives. Do you then use computer software to convert your negative scans to positive images?
John Adams
November 21, 2021 at 12:11 pm
Ray, I’m loving your setup! Sounds like a lovely way to copy transparencies.
Yes, I use a Photoshop plugin called Negative Lab Pro to convert the negative images into positives. It works very well in most cases
Steve Marino
October 6, 2023 at 3:18 pm
I like the simplicity, and it looks sturdy. But for the life of me, I can’t see why someone that already had a decent scanner wouldn’t just use it vs setting this Negative Supply system up. This is surely quicker, but it’s not like it takes forever to scan a neg either, and there probably won’t be much or any difference in end quality. I’d rather invest the money into some darkroom equipment and print the negs in FB paper.