
Written by Jen Golay
I remember when I was younger being very intimidated by all of the numbers, and strange numbers at that—2.8, 5.6, 11—on the lens and dials of SLR cameras. Exposures like f/2.8 at 1/125th with ISO 100 seemed like an exotic language that I would never understand.
I stayed away from photography until the first generation of DSLRs and only bought one because I thought it would be a “safe” way to learn photography. I could delete all of my mistakes and not waste film and money.
As soon as I could shoot in manual mode with good exposures, I’d buy a nice film camera and be on my way. That is pretty much what ended up happening, too!
In my last two articles about the Sunny 16 rule and night photography, I mentioned reciprocal or equivalent exposures, and I got to thinking recently that maybe I should say a little more about this topic.
Experienced photographers will be familiar with making these calculations, but photographers at the beginning of their journey may not. And the fear of making calculations was a big factor in keeping me from photography for so many years.

The Exposure Triangle
Every exposure has three elements: ISO (film speed), shutter speed, and aperture.
It helps to think of these as three arms of a scale. If you change one, you’ll have to compensate for it by changing another arm to keep everything in balance. Or if you change two, you’ll have to calculate the next exposure change to balance the remaining arm.
In digital photography, you can change any of the three elements for each frame you shoot to get a good exposure and to get certain creative looks like motion blur or a shallow depth of field. However, in film photography, one variable—ISO—will remain constant for the length of one roll of film.
This makes shooting film easier in my opinion. You only must focus on balancing two of the three arms of the exposure triangle, shutter speed and aperture.
Making the correct changes to balance out the exposure triangle can result in a number of different combinations that all create good exposures. Those other exposures are called equivalent or reciprocal exposures.


Let’s review each element of the exposure triangle:
ISO is how sensitive your film is to light.
Shutter speed is how long your shutter is open.
Aperture is how large or small the opening in your lens is.
All three elements are measured in stops. Stops are either half the amount of light of the next stop or double the amount of light of the previous stop.
It is adjusting these stops that will balance your scale. If you take two stops away in shutter speed, you’ll need to add two stops to your aperture.
If you have a digital camera or one of the later film camera models, you have the option to have shutter speeds and sometimes apertures in partial stops, and that’s great for even more dialed in exposures; however, most film cameras operate in full stops.
Some hand-held light meters can also be set to calculate partial stops. We will be only working with full stops since they are much easier to calculate mentally.

What is ISO?
When film is manufactured, it is made light sensitive, and how much sensitivity is has is notated as ISO. The ISO is printed on the outside of your film.
Lower numbered ISO films (those below ISO 400) are considered slow film since they are less light sensitive and will require more light. Higher numbered ISO films (those above 400) are considered fast film since they are more light sensitive and require less light.
Generally, you’ll find film ranging in ISO from 50-3200, and each ISO is either double the one before it or half of the one after it:
ISO 50, 100, 200, 400, 800, 1600, and 3200.
You don’t need to memorize these numbers, but be sure to dial in the correct number on your camera or light meter. You can set it and then forget it.
The term ISO was previously known as ASA, so you may see that on some older film cameras and light meters.

Shutter Speed Stops and How They’re Measured
Shutter speed is the amount of time your shutter is open, and it is measured in fractions of a second up to one second and then full seconds after that.
The slowest shutter speed is B (bulb), which means that the shutter will stay open for as long as you hold the shutter button down.
Many film cameras max out at a shutter speed of 1/500th of a second, but some electronic film cameras can reach up to 1/4000th or 1/8000th of a second.
Shutter speed stops are either half or double one another:
B (Bulb) 1, 1/2 1/4, 1/8, 1/15, 1/30, 1/60, 1/125, 1/250, 1/500, 1/1000, 1/2000, 1/4000


Understanding Aperture
Unlike ISO and shutter speed, which are pretty easy to understand, apertures are a little more confusing and a little less intuitive. This was the most intimidating aspect of photography to me when I started out.
The numbers correspond to how large or small the aperture of your lens is, and what makes them so confusing to so many beginners is that the larger the number, the smaller the opening. These numbers are called f/stops.
This became much less confusing to me when I started to think of f/stops as fractions like shutter speed. (In fact, f/stops are fractions! Focal length/diameter.)
When you think of them that way, it’s easy to see that 1/22 (f/22) is without doubt smaller than 1/5.6 (f/5.6).
Full aperture or f/stops can go as low as f/1.2 or even f/.95 on a few rare lenses, but most range from f/1.4 to f/22.
Here are the full f/stops for most lenses from the smallest to the largest aperture:
f/22, f/16, f/11, f/8, f/5.6, f/4, f/2.8, f/2, f/1.4
Note you may see some lenses that max out at f/1.8. These are usually less expensive that f/1.4 lenses. F/1.8 is just slightly smaller than f/1.4.
You’ll find it most helpful to memorize the range of shutter speeds and f/stops on your camera. Having them memorized will enable you to quickly calculate reciprocal exposures.

Balancing Your Exposure
When you use your light meter, whether in your camera or a hand-held light meter, it measures the light reflected by the subject (reflective) or the light falling on the subject (incident). You will have already dialed in the ISO you’re using, and then you will dial in the aperture and shutter speed needed to zero out the in-camera meter.
Or perhaps you have dialed in the aperture you want to use in your hand-held meter based on how shallow or deep you want your depth-of-field, and the light meter will calculate what shutter speed you need to use to get a good exposure.
Remember that because you are shooting film, your ISO will remain constant. Shutter speed is how long the light has to enter the camera, and the aperture is how large or small the opening is.
A fast shutter speed will usually require a larger aperture to let in enough light for a good exposure, while a slower shutter speed will usually need a smaller aperture to not let in too much light.
As we said earlier, there can be more than one good exposure depending on how you balance the elements in the exposure triangle.
For example, if you decrease the amount of light coming into the lens by stopping down your aperture, you’ll need to increase the length of time the shutter is open. Or if you decrease the amount of time your shutter is open, you’ll need to open up your aperture to let in more light.
Can you see how we are balancing the scales by changing amounts in shutter speed and aperture?
Remember that exposure is a zero-sum equation. To always have a good exposure with various combinations of elements of the exposure triangle, the sum of the adjustments must always equal zero. What you take from one, you must add to another.
Let’s take a look at some real-life examples.


Reciprocal Exposure Examples
Example #1
You’ve metered a lovely scene on a bright sunny day. You’re shooting with Kodak Ektar 100 film, which likes to be exposed right at box speed and doesn’t tolerate much over- or underexposure.
Your meter says f/16 at 1/125th of a second. You’d like to use f/4 instead. What would your equivalent exposure be?
Here’s how I think through this question. I mentally count the exposure difference between an aperture of f/16 to f/4:
f/16 to f/11 is one stop, then to f/8 is two stops, f/5.6 is three stops, f/ 4 will be four stops. That is a four-stop difference.
Then, I mentally count through four shutter speed stops. But which direction do I go?
Since I am opening up my aperture and letting in more light, I am going to have to decrease the amount of time the shutter is open to balance out these two elements of the exposure triangle.
So, four stops faster than 1/125th of a second would be 1/250th for one stop, 1/500th for two stops, 1/1000th for three stops, 1/2000th for four stops.
My new exposure is f/4 at 1/2000th of a second.

Example #2
Let’s do another one.
You’ve metered a family of eight in open shade. You’re shooting with Kodak Portra 800 film and the meter reads f/2.8 at 1/500th of a second.
You want to make sure everyone is in focus, so you know that you’ll need to stop down to at least f/8.
You’re getting those f/stops memorized, so you know that f/2.8 to f/8 is a three-stop difference (f/2.4 to f/4 is one stop, then to f/5.6 is two stops, and then to f/8 is three stops).
But is my shutter speed going to be faster or slower? Since you are stopping down and making your aperture smaller, that means you’re going to need your shutter to be open longer to balance the exposure. Three stops slower than 1/500th of a second on the shutter speed dial is 1/60th of a second.

Example #3
This is fun! Let’s keep going!
You’re at a college football game on an overcast Saturday afternoon. You’ve got some Kodak Portra 400 film in your camera and your meter gives you an exposure of f/11 at 1/60th of a second.
You know that shutter speed is too slow to freeze the action and that you’ll need to get it up to at least 1/500th of a second. That’s a three-stop difference (1/125th, 1/250th, 1/500th).
Now you’ll need to adjust your aperture, but do you need to open it up or stop it down? Since you’re shortening the length of time the shutter is open, you’ll need a wider aperture. Three stops wider is f/8, f/5.6, f/4.
F/4 is probably not a great aperture for the offensive line to be all sharp, but it would work for a good shot of the quarterback.

Example #4
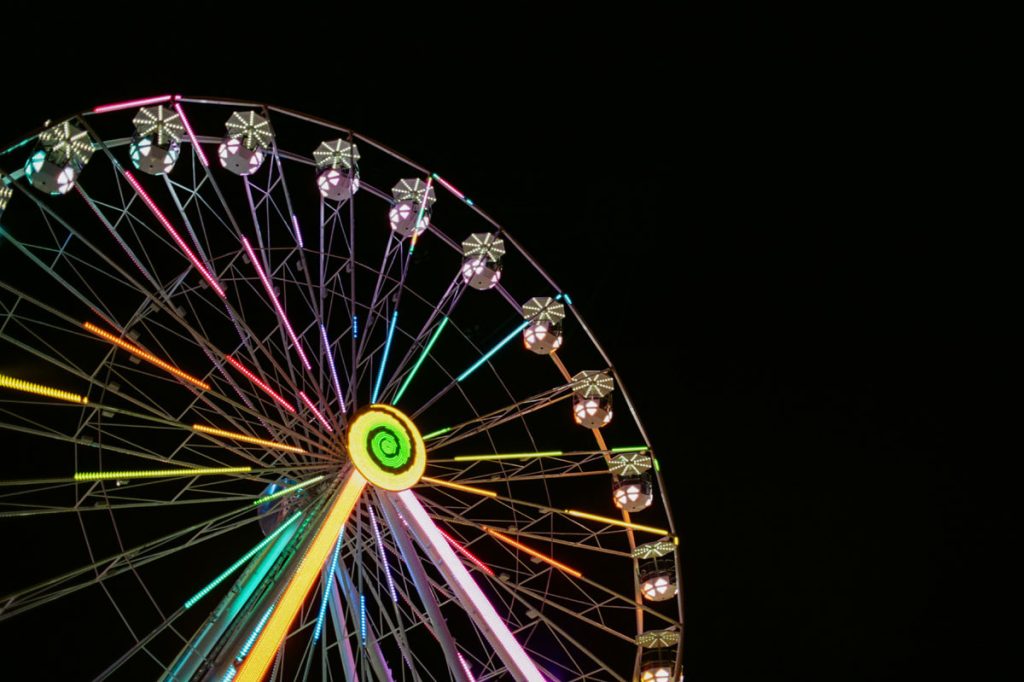
Let’s try a night photography example.
You’ve got your camera and tripod set up on a bridge at twilight. You’re looking to get some headlight and taillight trails. You’ve got some Kodak Gold 200 film in your camera, which is great for a longer exposure since it’s a slower film. Your light meter has given you an exposure of f/2.8 at 1/250th of a second.
You know that’s too fast to get any kind of motion blur. You’re probably going to want to slow it down to at least 1/15th of a second. Counting down to 1/15th of a second gives you a four-stop difference.
What are you going to do with your aperture? If you’re slowing down your shutter, you’re going to have to stop down your aperture to keep the exposure balanced. Four f/stops from f/2.8 is going to be f/11.

Example #5
One last example.
I’m going to give you one last example that is perhaps the one time when you’re going to change your ISO when calculating reciprocal exposures when shooting film. You’ll do this when you’re rating your film differently from box speed.
And really, you won’t need to calculate reciprocal exposures unless you want a personal challenge. You’ll let your light meter do the hard work by dialing in a different ISO.
But what you will need to know how to figure out is which ISO to dial in. You’ve got some of the last Fuji Pro 400H film in your camera. You know that film is light hungry and likes to be overexposed by about two stops. You can let your light meter calculate those equivalent exposures by dialing in the right ISO.
What ISO will you need to overexpose Fuji 400h by two stops?
Since ISO is how light sensitive your film is, to get a brighter exposure than an ISO 400 film, you’ll need a film that would require more light with either a wider aperture or a slower shutter speed. This would be a slower film.
One stops slower than ISO 400 is ISO 200, and two stops is ISO 100. So, to overexpose an entire roll of Fuji 400H by two stops, you would dial in ISO 100 into your camera or your light meter.

Changing More Than One Ratio at a Time
Note that I’ve kept these examples pretty simple by only changing one ratio in the exposure triangle equation.
You can change more than one ratio that will make your calculations a little more complex.
For example, ISO 400, f/4, and 1/125th of a second is equal to ISO 800, f/16, at what shutter speed?
f/4 to f/16 is 4 stops less light. (f/4 to f/5.6 is one stop, to f/8 is two stops, to f/11 is three stops, to f/16 is four stops.)
ISO 400 to ISO 800 is one stop more light.
The net change in light is three stops less light, which means you’ll need to increase the shutter speed by three stops: f/125th to 1/60th is one stop, 1/60th to 1/30th is two stops, and 1/30th to 1/15th is three stops. Your new shutter speed will be 1/15th.
Since you won’t be changing ISO while shooting film, this is really just a thought exercise.


More Practice
Here are some practice reciprocal exposure equations. Let’s see how you do!
- ISO 100, f/4, at 1/60th of a second is equal to f/4 at 1/250th of a second at what ISO?
- ISO 400, f/16, at 1/15th of a second is equal to ISO 400, f/2.8, at what shutter speed?
- ISO 200, f/ 5.6, at 1/500th of a second is equal to ISO 200 at 1/30th of a second at what aperture?
- ISO 3200, f/11, at 1/250th of a second is equal to ISO 3200, f/ 5.6, at what shutter speed?
- ISO 800, f/22, at 1/1000th of a second is equal to ISO 800 at 1/4000th of a second at what aperture?
Extra credit: ISO 800, f/11, at 1/15th of a second is equal to f/2.8 at 1/60th of a second at what ISO?
Answers
1. ISO 400, 2. 1/500th of a second, 3. an aperture of f/22, 4. 1/1000th of a second, 5. an aperture of f/11
Extra credit: +4 aperture
-2 shutter speed
+2 net exposure difference
The ISO will be 200.


Uses for Reciprocal Exposures
Bracketing Your Exposure
Many cameras have an automatic bracketing feature that, once activated, will take three exposures all varying by one stop. These three exposures are usually one stop underexposed, one correctly exposed, and one stop overexposed.
If your camera doesn’t have an automatic bracketing feature, you’ll need to calculate those bracketing exposures yourself.
Using the Sunny 16
You may remember from the Sunny 16 article that to be able to use the Sunny 16 Rule in other lighting situations or with apertures other than f/16, you’ll need to be able to calculate reciprocal exposures.
Night Shooting
In order to meter in some low light situations, you may need to max out your ISO on your meter to get an exposure reading and then calculate the reciprocal exposure for the correct ISO of the film in your camera before taking the shot.
You can read more about that here in the night photography article.
Creating Your Own Cheat Sheets
You might want to make your own cheat sheets for various shooting situations that you find yourself in. Knowing how to calculate reciprocal exposures will give you multiple exposure options that you can keep at your fingertips.


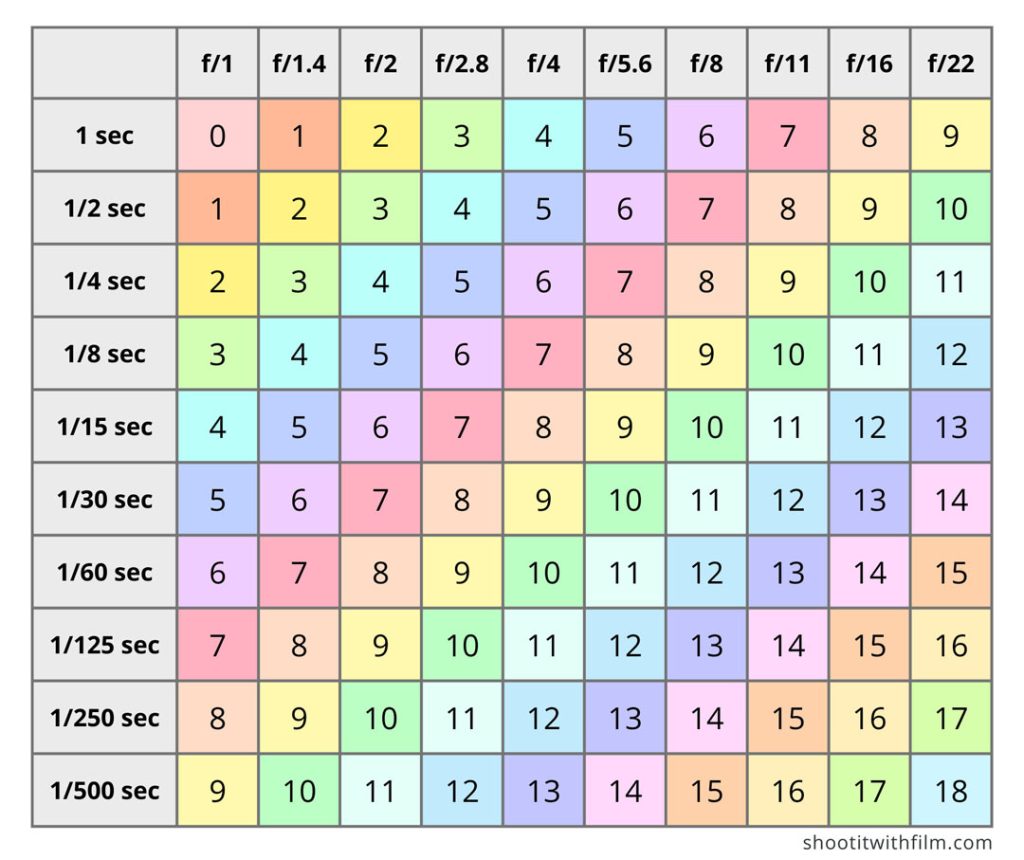
Reciprocal Exposure Calculators
You will find using reciprocal exposures the easiest and the fastest if you memorize your stops and make the calculations mentally, so it may seem counterintuitive for me to share a reciprocal exposure chart.
You can use it to check your answers as you practice calculating reciprocal exposures. Feel free to make your own chart and expand it to the maximum shutter speed on your camera.
You can also use your light meter to check your work.
And if you want to dig deep, you can play with this online equivalent exposure calculator that includes partial stops.
However you decide to practice and learn to calculate reciprocal exposures, choose something that works for you.

Final Thoughts
Equivalent exposures can seem intimidating when you are first learning photography and shooting in manual mode, but mastering their calculation will make you a better photographer.
Just remember to keep the arms of you scale balanced!
How are you doing with calculating reciprocal exposures? I’d love to hear about your progress!

Thank you so much, Jen! Jen is a regular contributor here at Shoot It With Film, and you can check out her other articles here, including 15 Must-Have Film Photography Accessories and What is the Sunny 16 Rule and Why Should You Learn It?.
You can also check out more of Jen’s work on Instagram.
Leave your questions about the exposure triangle and reciprocal exposures below in the comments!


Leave a Comment
Shoot It With Film on Instagram


Blog Comments
Michael S. Goldfarb
March 18, 2023 at 8:42 am
Excellent article, Jen!
But you might want to mention somewhere up front that the term for film speed used to be different, so as not to confuse newbies encountering older cameras.
A film’s “ISO” (abbreviation for International Standards Organization) was previously called “ASA” (abbreviation for American Standards Association). I believe that change took place sometime in the 1980s.
Most of the light meter film speed settings engraved/printed on older cameras will be marked “ASA” instead of “ISO”. The numbers – 50, 100, 200, 400 – are still the same, but it won’t say “ISO”.
Folks looking for the “ISO” control on their “new” 35mm cameras aren’t going to find it on the most manual focus-era classics. It’s “ASA”!
Jen Golay
March 20, 2023 at 9:11 am
Thanks for the suggestion! We added more information to the article.