
Written by Kim Hildebrand
Ansel Adams’s Zone System is genius. It’s how I learned to expose black and white film, and it’s so easy once you understand it and know how to use it.
I use it all the time while photographing personal work, both indoors and outdoors in natural light. Although Ansel’s system was initially set up to create beautiful black and white prints, I’ve found it works well for both color and black and white film.
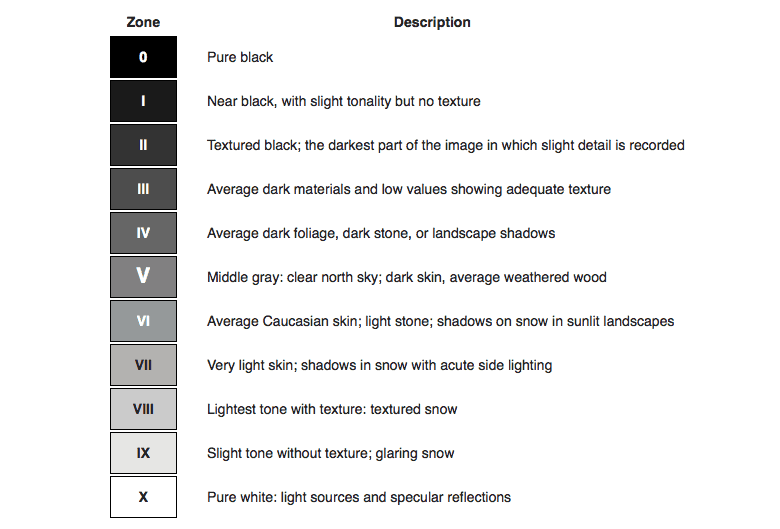
If you’re not familiar, his zone system looks like this (courtesy of Wikipedia):
What is the Zone System?
The 11 zones in Ansel Adams’s system represent the gradation of the different tonal values in a black and white print. Zone 5 is middle gray, zone 0 is pure black (with no detail), and zone 10 is pure white (with no detail).
Theoretically, each zone represents one f-stop in exposure.
You’ll also notice there is then an 11-stop difference between pure black and pure white, with a 7-stop difference between the darkest black with detail and the lightest white with detail.
That’s quite a lot of latitude to work with and one reason we love film, right?!
How to Determine Exposure Using Ansel Adams’s Zone System
You might be thinking, Yeah, okay, great. Thanks for the nerdy science/history lesson. How is this going to help me?? Okay, ready?
What do we all know about the internal meter in our camera? If put at correct exposure, the middle bar in your internal meter exposes for middle gray.
Not white or black, but middle gray, which is Zone 5 of the Zone System. Middle gray is the same tone as an 18% gray card, weathered wood, lighter greenery, or dirty concrete.
So, what if you decide to take your kids to the lake and bring your camera to take some epic, artistic film photos, and you forgot your external light meter?
How will you know how to expose? With only an in-camera light meter and the Zone System, you can figure out your best exposure by placing the important items (your kid’s faces, the sky, the water, etc.) in the right zones.
How do you place important parts of the scene in the right zones?
Well, if your camera, when metered on their skin (for light, Caucasian skin), is showing an exposure value of 0, you know their skin will expose as a middle gray tone.
But if you use the Zone System chart, you’ll realize that light skin isn’t a middle gray tone. It’s quite a bit lighter. The tonal value for light skin on the Zone System is in zone 7.
Remembering that each zone equals one stop, you’ll want to increase the exposure on your camera 2 stops. This will expose the light skin for zone 7 instead of zone 5.
Now, when you spot meter for the skin tone, your meter will read +2 instead of 0.
Before you take the photo, also do a quick meter check on other parts of the composition.
I know by looking at this photo below, the dock and the darker part of my daughter’s hair should be Zone 5 – middle gray. I also know that the foliage behind them would be one or two stops darker.
By using spot metering on your camera, meter on parts of the scene to see if they match the tonal value you want.
The Zone System tells us that there is only a 7 stop difference between the darkest part of the image with detail and the lightest part of the image with details, so, if the darkest and lightest parts of your image are more than 7 stops apart, understand that you will lose detail in either the highlights or shadows.


Examples Using the Zone System
Without getting much more nerdy on you, I’ll show you some examples from my recent excursion to lovely Coeur d’Alene, ID.
(If you haven’t been there, I highly recommend it! It’s a fantastic vacation spot for families.)
All the film I used (Fuji 400h (find on Amazon), Kodak Portra 400 (find on Amazon), and Tri-X (find on Amazon)) were rated at box speed.
In the photo below, I metered on the gray water as Zone 6 or 7.
I wanted the sky to be in zone 8, so I made sure my in-camera meter read +2 for the water, and the sky +3. My daughter was 0 (she is also backlit by an overcast sun).

In the next photo, taken on a sunny day while the sun was high in the sky with Tri-x rated at 400, I wanted his face to be exposed correctly.
Here, I placed his face in Zone 7, which is +2 on my in-camera light meter.
You can see plenty of detail where it matters most. Although there is a little highlight blowout on his arm, in this case, I think it adds to the summery beach feel.

I metered the same way in the photo below. +2 in-camera spot meter on their skin tones.
It was mid-day and heavily backlit, but the awning cut out some the glare for me which made it work.
If the awning wasn’t there I would have opened up another stop.

Same method here.
Since we were approaching golden hour, the sunlight is softer and wraps around the subjects a bit, so I didn’t need to open another stop.
So I placed them in Zone 7, +2.

You may be surprised to hear I metered the below photo the exact same way.
I placed the skin tones in Zone 7, +2.
It looks different because they are front lit in full sun vs. backlit and it still looks amazing because it’s, well, the magic of film.

Sidelight in late evening: Can you guess how I spot metered here?
In scenes with varying contrast like this, I take a few spot meter readings.
I knew his face was in shadow and would be darker, I metered for the skin of the subjects opposite him, and also took a reading of the greenery to make sure I was in a range I liked.

Last, the Zone System can be very convenient in night shots.
I wanted him in silhouette in the photo below, so I spot metered and made sure he was a few stops below Zone 5, so Zone 3 or 2, -2 or 3.
I metered the sky at Zone 5, or zero exposure compensation. And this is not pushed.
Film handles low light better than we think, so give it a try!

Do you see a pattern here?
Spot meter for the most important parts in your composition. Then, place their tonal values (or essentially, exposure) where you want it.
Where do you want the focus and detail?
When it is sunny out, you will see a wider tonal range in your scene.
With black and white film especially, if the sunny tonal range is over 7-stops, then you’ll have to choose whether you want some loss of detail in the highlights or in the shadows.
You will have to decide what is the most important range for your exposure. Are you okay with losing a little detail in the shadows or the highlights?
Alternatively, you can choose to compress the tonal range by adding light to the shadows via a flash or reflector or finding a way to darken the highlights (using a scrim, perhaps).
I hope this was helpful and de-mystified the Ansel Adams’s Zone System for you. I encourage you to try using it on your next excursion!
Thank you so much, Kim! Be sure to check out Kim’s awesome online course about using flash with film here, and to see more of Kim’s work, visit her website and Instagram feed. You can also check out her other Shoot It With Film articles here.
Kim is also one of four amazing instructors teaching at the Film Camp workshop this September in Palm Springs, CA, where you can learn all about film and family photography! Find out all of the details here!
Read more film photography tutorials here, and if you have questions about using the Zone System, leave them below in the comments!


Leave a Comment
Shoot It With Film on Instagram


Blog Comments
Drew
March 9, 2024 at 8:20 am
Very helpful for understanding this better( thanks for the article! I’m reading this in the car on my way to Big Bend For my first excursion with my Crown Graphic and looking forward to experimenting with the zine system!