
Written by Samantha Stortecky
Hello everyone! I’m so happy to be back here, giving you all the fun tips and tricks for my fellow film lovers! I hope you all have been having a wonderful summer, and hopefully shooting all the film.
Today, I’m reviewing one of my absolute favorite cameras, the Fujifilm Instax Wide 300.
I got this beauty as a birthday gift a few years ago, and, while I immediately loved it, I bombed my fair share of film packs trying to figure out how to properly use it.
That’s why I’m reviewing this camera for you guys, so you can go out there, take great images, and live your best lives!
Alright, now let’s get to the fun part and jump headfirst into the tutorial!
Find the Fujfilm Instax Wide 300 on Amazon.


Instax Wide 300 Camera Details
This camera is a pretty easy camera to find, and it’s available on Amazon. The camera came in a box with a manual, strap, four AA batteries, and a clip-on for close-up lens shots.
The camera is pretty light which makes it very easy for carrying around for long distances and big trips. It is a great travel companion if you’re looking for an instant camera to take on your fun journeys!
Compared to other instant cameras, it’s exposure time per image is much faster.
A thing to remember about this camera is that you are getting an instant camera at it’s barebones. No fancy buttons or anything like that with this baby. It’s genuinely just a simple camera without all the fluff that some instant cameras on the market have nowadays.


Instax Wide vs. Instax Mini Image Size
The size of the images initially drew me to this camera. The Instax Mini’s images were just too small for my taste, so I knew the wide 300 would be perfect for me.
The images for the Wide are double the size of the Mini’s, measuring in at 4.2” by 3.4”. Here’s an image for comparison:

And if you want to know more about scanning Instax images, check out my article here on Shoot It With Film on How to Scan Polaroid Photos.
Accessories
Other than a clip-on attachment for up close shots, there aren’t too many available accessories for the Fuji Instax Wide. But, luckily, there are some fun resources you can get to help keep your images and your camera safe!
Here are a few of my favorite resources (all found on Amazon):

Using the Instax Wide 300
As I stated above, when I first got the Instax Wide, I tanked quite a few packs of film because I just couldn’t figure out how to properly use the camera. All my images were coming out underexposed, blurry, too far away, etc.
It took a little research and trial and error to figure out how to use this camera to it’s fullest potential. It can be a little temperamental to learn at first, but when you do finally get the hang of it, the images are quite beautiful!

Focusing
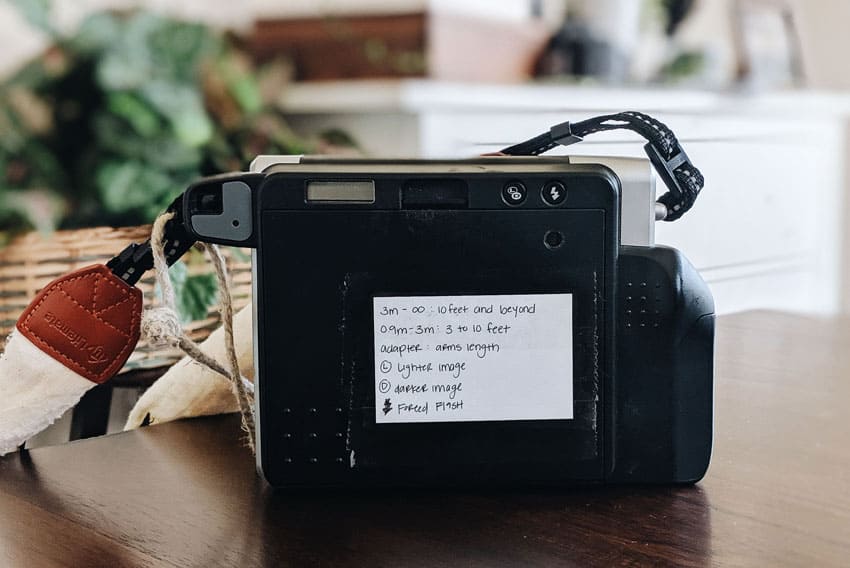
On the lens, the camera has specific settings for distances. You have two different settings, one for 3 to 10 feet and one for 10 feet to infinity. This was where I struggled with getting blurry images.
This camera is very picky about your distance to your subjects. So picky in fact I ended up writing myself a little cheat sheet and taping it to the back of my camera so I wouldn’t forget!
You’ll often hear me yelling, “Am I 3 to 10 feet away?!” before taking an image. The 3 to 10 feet setting on the lens is good for portraits, and the 10 to infinity setting on the lens is terrific for landscapes or anything that is far away.
The Close-Up Attachment
When you purchase this camera, you also receive a clip-on lens that allows you to take selfies or up-close images that are an arm’s length away.
I highly recommend that you DON’T take selfies with it, they are not flattering in the slightest and trying to get the camera in position is an arm strain. Just don’t do it!
However, using the clip-on attachment for up close images can be fun, especially with how well this camera retains clarity and detail.
I particularly love it for flower images or anything colorful and scenery related. I usually just put my arm out and make sure my subject is right where my fingertips are, that’s the perfect distance for using the close-up attachment!

Light and the Instax Wide
Unless you’re a huge fan of flash, this camera is incredibly light hungry.
I find that it works its absolute best around sunset time when the light isn’t too harsh and there is still enough that won’t trigger the flash to turn on.
I’ve taken pictures in the forest where there has been a ton of light and I put my camera on “Lighter” mode and still ended up getting severely underexposed images. Light is your friend when it comes to this camera!
Special Techniques
The Instax Wide is a very simplistic camera in its design and use. However, I’ve found that if you aim it just right, you can get a fun sun flare in your images without blowing out all the details.
I’ve found that angling your camera so that the sun is just out of view on the left or right side, during sunset, will give you some fun flares!

Related: How to Scan Polaroid Photos
Pros of the Instax Wide 300
Image Sharpness: One of the best pros for the Fujifilm Instax Wide is how sharp the images are compared to other instant film cameras. Maybe it’s because my original Polaroid camera is an oldie, but I find that my Instax images are clearer and sharper looking compared to my Polaroids.
Film Price: Also, the film is considerably cheaper, and you get more images per pack. And everyone loves more pictures, especially since these images are much bigger than its counterparts!
Sunsets/Sunrises: Another pro for this camera is that it captures some of the most beautiful sunset and sunrise images. Because it loves light so much, taking images during the sunrise or the sunset is truly where it shines. They are some of my favorite images to take with this camera!

Cons of the Instax Wide 300
Film Variety: A few of the cons is that unlike the Instax Mini, the variety in film packs is greatly lacking. Other than the regular pack and a pack for black & white images, I haven’t found any film packs that have fun borders or effects.
Fujifilm needs to up its game with the Wide 300 film packs because mama likes to experiment with crazy borders and effects! Can I get an amen?!
The Flash: One of the biggest cons for me is that there is no capability to turn the flash off.
Because of its simplicity, this camera will turn the flash on whenever it feels there isn’t enough light, which can be frustrating if you’re taking an image where you don’t want to lose the color or details.
Flash has its place, but I’ve found that it will go off in circumstances where I thought there was plenty of light which leads me to having to take more images and inevitably wasting film.

Best Uses
Like I stated above, sunrises and sunsets are going to be your best friend with this camera.
I also LOVE using this camera during trips where I know there will be beautiful landscapes. It does so dang well with scenery images with the amount of color and clarity that it captures.
It also does great for portraits if you’re in the correct lighting and standing at the right distance.
I love having this camera with me during my photo sessions with clients so that I can leave them with a tangible souvenir after their session. My clients LOVE being able to take a hard copy of their session home with them and it helps with the wait that most clients must go through when their photographer shoots film.

Related: Polaroid Originals OneStep 2 Review
A few extra tips for instant images:
If you want to write on your Instax image, only use permanent marker! Anything else will smudge! And make sure that after writing with your permanent marker that you give it a few minutes to dry before touching it.
Don’t shake your picture while it’s exposing!
This can be a no-no, and as tempting as it is to release your inner Outkast and “shake it like a Polaroid picture,” shaking it will ruin your image.
I once made the mistake of sticking an image in my pocket before it was fully developed, and I got a yellow streak in the corner. So be boring and set your newly printed image down on a table, gently! Or shake it and experiment with what the effect will do to your images, who am I to judge!? You do you, boo!

Thank you so much, Samantha! Samantha is a regular contributor here at Shoot It With Film, and you can check out her other articles here., including How to Scan Polaroid Photos and How to Shoot Kodak Portra 400. You can also check out more of Samantha’s work on her website, business Instagram, or personal Instagram.
Leave your questions about the Instax Wide 300 below in the comments! And if you want to pick up one for yourself, check it out on Amazon here: Fujifilm Instax Wide 300, Fujifilm Instax Wide Film
Want to learn more about shooting Polaroids and instant film? Check out all of our instant photography articles here!


Leave a Comment
Shoot It With Film on Instagram


Blog Comments
Linda Garcia
December 14, 2020 at 9:16 pm
After discovering my instamax wide 300 up in my closet, after a couple of years (or more), I put in new batteries and replaced the film. Does not work. The film is a few years old too. Could that be the problem?
shootitwithfilm
December 20, 2020 at 7:49 pm
Hi Linda! It sounds like the camera is probably broken. Unless the film was exposed to light, it should work even if it’s a few years old.
Cameron
April 22, 2022 at 12:18 am
Saying that the film is cheaper is misleading if you don’t already own and use a Polaroid camera. Compared to Instax Mini or Square film, it’s a lot more expensive. Obviously it’s significantly more expensive than straight digital photography, even when you get some digital pics printed.
Sundar
January 14, 2023 at 10:18 am
Hi Samantha Stortecky, great review of the camera. Question,is it safe to have the instax film camera sent through the x-ray scanner at the airport security ? Thank you, Sundar
shootitwithfilm
January 14, 2023 at 7:51 pm
Hi Sundar! If there is film in the camera, it’s best to have the whole camera handchecked by security instead of going through the x-ray machine. The x-ray machine won’t hurt the camera, but it might damage the film that’s in the camera.
Alexis
May 21, 2023 at 4:33 pm
I have this camera and lately ive been noticing that in the corner of my photos its like a flower image/smudge that develops on the film. Do you think that is a flaw in the film or my camera when shooting?
shootitwithfilm
May 21, 2023 at 8:31 pm
Hi Alexis! Marks like this are pretty common on Polaroid film, but I haven’t seen them too often on Instax. They are usually caused by accidently putting pressure on that part of the image when it is still developing or possibly from the rollers in the camera. The rollers may be dirty causing some uneven pressure when the image is ejected. Expired or old film could also be the problem, but since it seems to always happen in the same spot, I’d try to clean the rollers and see if that helps!
Nora
July 15, 2023 at 9:24 pm
Hey I was wondering if I’m able to lay my wide 300 on its side in my purse? It’s the only way it fits 🙁
shootitwithfilm
July 16, 2023 at 6:43 pm
Hi Nora! You should be able to lay the Instax Wide on its side in your purse without any problems! It’s plastic, but pretty solid, and I usually throw it in a bag or purse without any extra protection and it does great. Just be careful that you don’t have anything sharp or heavy in your bag that it could knock into too much.